Examining a Sample Setup
Setup and Configuration - Setting up retailer groupsA textual summary of the Platform Foundation video is provided below. Training Accounts
You’ll be provided with a training account (e.g. `FCTRAINAU<number>`). Inside that single account, we model a retail group with two retailers:You can think of them as two brands under the same group, sharing some things (like product data) but each having their own locations and workflows.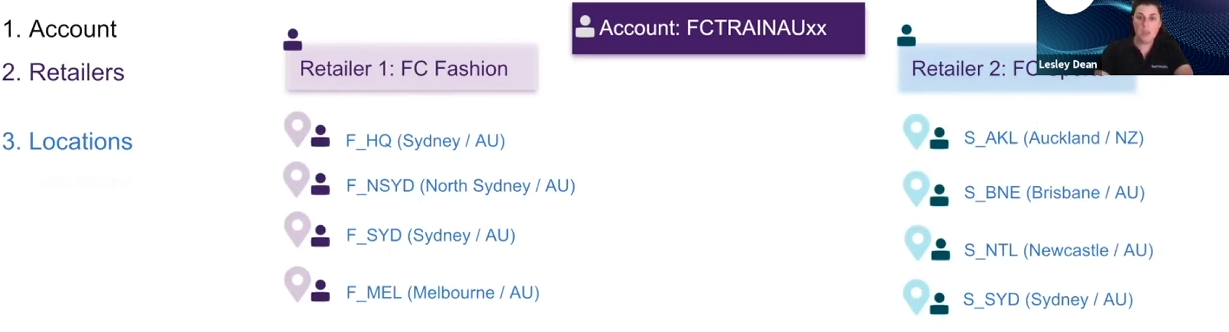
Locations and Networks
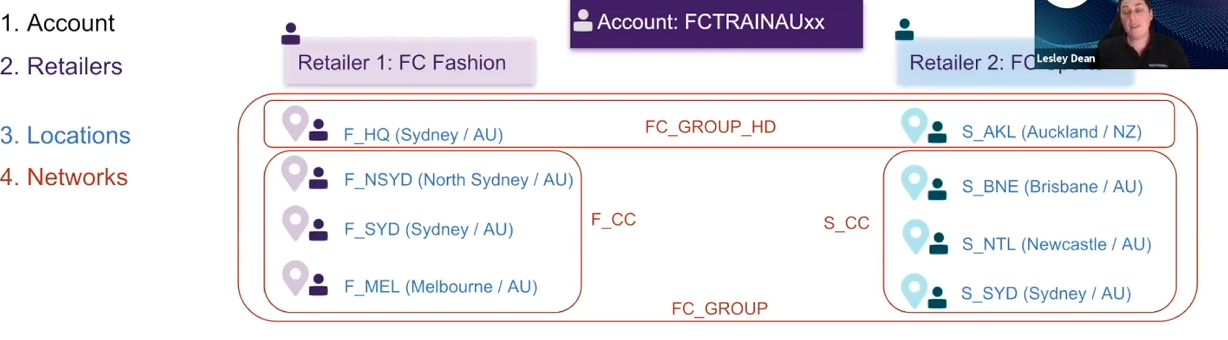
Each retailer gets four locations (stores/warehouse). A location can belong to one or many networks, and networks are just logical groupings used for fulfillment and inventory views. For example, these locations can be grouped into networks to support different fulfillment options:- An HD (Home Delivery) network that includes one location from each retailer (shared network).
- A Fashion Click & Collect network with Fashion store locations.
- A Sports Click & Collect network with Sports store locations.
- A Group network with all locations, plus extra region-based networks (by state/country). These, like Group Networks, are used for demonstration only, and are not used in the workflows yet.
Catalogs and Virtual Catalogs
There will be two catalogs, the Product Catalog (PC) and Inventory Catalog (IC).- The Product Catalog is a single shared catalog for the group (e.g.
`FCRG:PC:Master`) that both retailers use. This stands for 'Fluent Commerce Retail Group Product Catalog Master'. - The Inventory Catalog is used for batch imports, and must follow the convention
`DEFAULT:<RETAILERID>` so the system knows which retailer “owns” the inventory records when the batch API is used.
On top of those, there are also virtual catalogs that are tied to networks. For this example, there will be 3 of them:- A Home Delivery virtual catalog based on the HD network.
- Two Click & Collect virtual catalogs, one per retailer.
Product and inventory data is defined once by PC and IC respectively, then virtual catalogs and networks decide which items are sellable where and for which fulfillment type.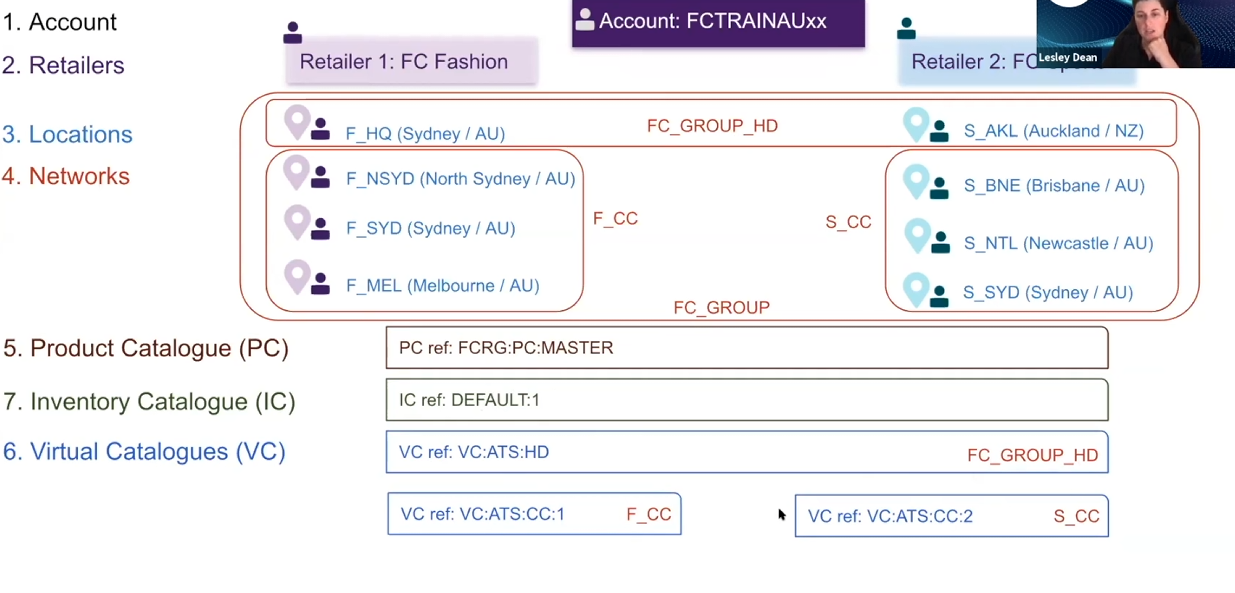
Data files and How LaunchPad Uses Them
All of this setup is driven by CSV data files. Each CSV has a header row plus one row per record (e.g. one retailer, one location, one network, etc.). When you run LaunchPad via Postman Collection Runner, each row becomes one iteration of the collection (one loop of API calls).For this course, you’ll use the Postman UI (not CLI) so you can see what’s happening, but the same idea works from the command line too.LaunchPad reads the file and figures out the type (retailers, networks, inventory, etc.), then runs the right flow for that file.Users and Created Roles
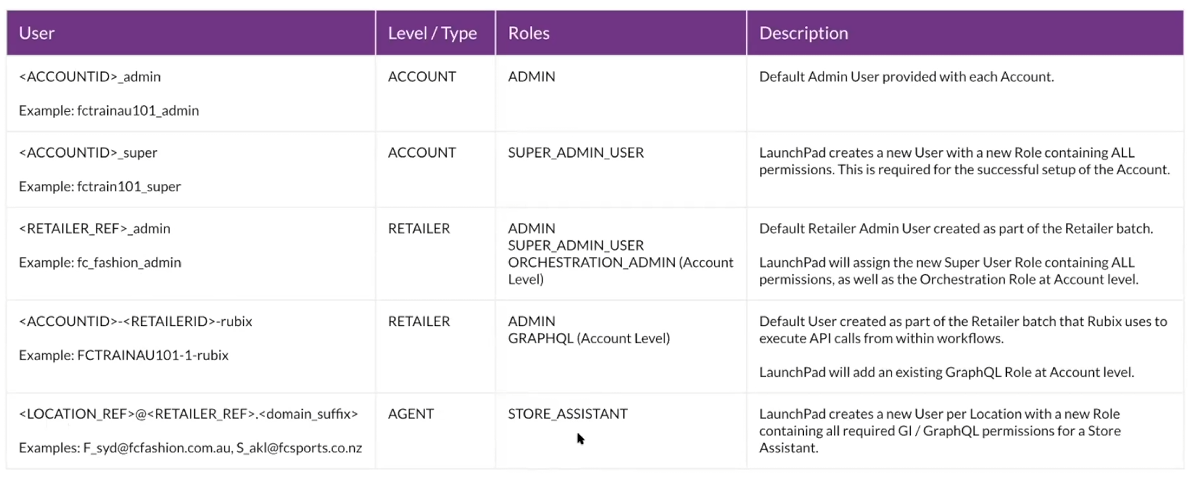
The setup defines a clear user model, mixing platform defaults with LaunchPad-created users.- Account Admin (platform default)
`<ACCOUNTID>_admin`- Account-level user with an admin role.
- Super User (created by LaunchPad)
`<ACCOUNTID>_super`- Account-level user.
- Gets a SUPER_ADMIN_USER role (also created by LaunchPad) with all permissions.
- This user is critical for performing the rest of the setup safely.
- Retailer Admin
`<RETAILER_REF>_admin`- One per retailer.
- Retailer-type user with an admin role plus:
- SUPER_ADMIN_USER role.
- ORCHESTRATION_ADMIN role at account level (so they can access the orchestration modeler in the console).
- Rubix User (per retailer)
`<ACCOUNTID>-<RETAILERID>-rubix`- Internal technical user for orchestration workflows.
- Gets admin by default, and LaunchPad adds GraphQL permissions at account level so workflows can call GraphQL APIs across retailers.
- Location Users (Agents)
`<LOCATION_REF>@<RETAILER_REF>.<domain_suffix>`- One per location; user type =
`Agent` (means “location user”). - Login-style name that looks like an email based on the location and retailer.
- Receive a Store Assistant role created by LaunchPad, which includes all the permissions needed for Global Inventory and GraphQL and future cross-retailer scenarios.
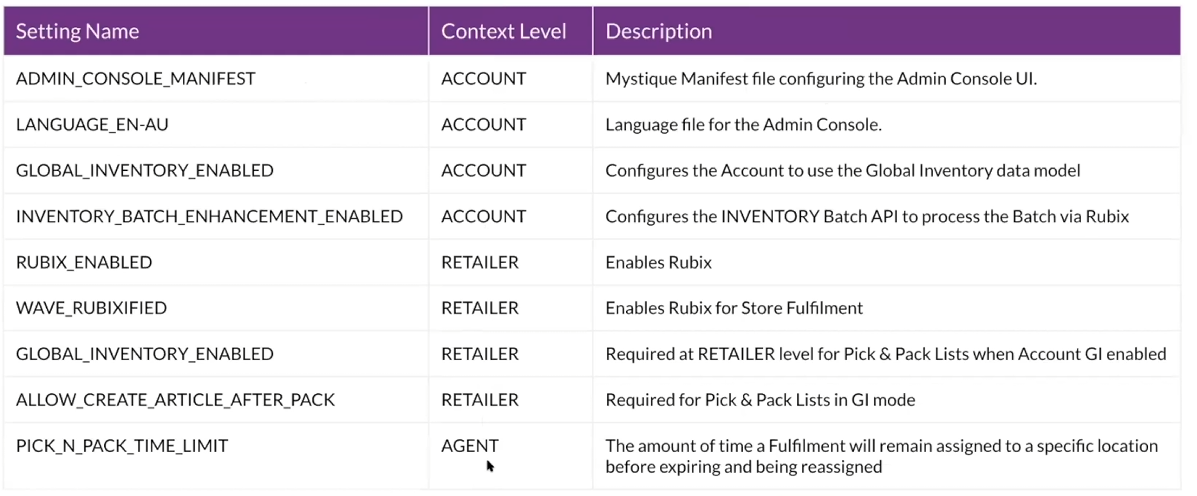
Settings at the Account, Retailer, and Location Levels
There are a small but important set of settings.Account-level settings:- ADMIN_CONSOLE_MANIFEST – the JSON config that defines the admin UI screens using the Mystique framework.
- LANGUAGE_EN-AU – we enable English (Australia) for the console.
- GLOBAL_INVENTORY_ENABLED – turned on because it’s off by default for backward compatibility.
- INVENTORY_BATCH_ENHANCEMENT_ENABLED – upgrades the REST batch API so it supports orchestrated Global Inventory.
Retailer-level settings:- RUBIX_ENABLED – turns on workflows for that retailer.
- WAVE_RUBIXIFIED – enables Rubix for store fulfillment orchestration.
- GLOBAL_INVENTORY_ENABLED – currently required so pick/pack lists behave correctly in Global Inventory mode.
- ALLOW_CREATE_ARTICLE_AFTER_PACK – another pick/pack-related setting for Global Inventory.
Location-level settings:- PICK_N_PACK_TIME_LIMIT – how long a fulfillment stays with a location before it expires and gets reassigned, so orders don’t get “stuck” and customers aren’t left waiting.
Settings work just like permissions. They can be applied at account, retailer, or location level depending on what behaviors should be controlled.