Fluent Commerce Logo
Docs
Sign In

SCIM Connector Package Installation

How-to Guide

Author:

Fluent Commerce staff

Changed on:

9 Oct 2023

Key Points

  • The SCIM connector is a Java based project that enables seamless integration with the SCIM. In order to install the SCIM Connector, you’d need to make sure you have the right dockers and tools. Next step is setting up the local environment, configuring the connector, and finally deploying the connector.
  • The SCIM connector and connect SDK versions need to be aligned.

Steps

Step arrow right iconProduct Structure

A Fluent Connector project typically has the structure as defined below. Any customizations / extensions can be done under the custom folder or as a separate module (jar).

No alt provided

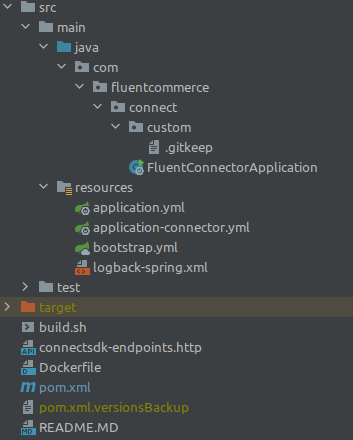
Regardless of which way chosen to extend it, the key message here is that any custom code should be under the 

`com.fluentcommerce.connect`
 package. This is because the FluentConnectorApplication is wired to work with Spring, and in its current form, Spring will only scan for components under 
`com.fluentcommerce.connect`
.

1package com.fluentcommerce.connect;
2
3@EnableCaching
4@EnableScheduling
5@SpringBootApplication
6public class FluentConnectorApplication {
7    public static void main(final String[] args) {
8        SpringApplication.run(FluentConnectorApplication.class, args);
9    }
10}

Language: java

Name: FluentConnectorApplication.java

Description:

[Warning: empty required content area]

This project relies on three key dependencies and configurations to drive the application's behavior.

1<!-- Fluent Connect SDK --> 
2  <dependency>
3      <groupId>com.fluentcommerce.connect</groupId>
4      <artifactId>connect-sdk-core</artifactId>
5  </dependency>
6  <!-- Fluent Connect SDK for AWS (allows the Connect SDK to be deployed on AWS) -->
7  <dependency>
8      <groupId>com.fluentcommerce.connect</groupId>
9      <artifactId>connect-sdk-core-aws</artifactId>
10  </dependency>
11  <!-- Fluent Connect - SCIM Connector Features-->
12  <dependency>
13      <groupId>com.fluentcommerce.connect</groupId>
14      <artifactId>scim-connector</artifactId>
15  </dependency>

Language: json

Name: pom.xml

Description:

[Warning: empty required content area]

All configuration files are located at 

`src/main/resources`
- a topic is further down the article dedicated to this.

Step arrow right iconUpgrading the Connector

The SCIM Connector and Connect SDK version are driven by both the parent POM and dependency, as shown below. It is important that when upgrading, both versions match.

1<parent>
2    <groupId>com.fluentcommerce.connect</groupId>
3    <artifactId>connect-sdk-scim-connector</artifactId>
4    <version>1.0.0</version>
5</parent>

Language: xml

Name: pom.xml

Description:

[Warning: empty required content area]

Although it is possible to have a different version of the Connect SDK specified at the dependencies, letting the parent POM settings bring the correct dependency is recommended. Using a newer version may introduce problems as it hasn't been tested or released for the SCIM Connector yet.


Step arrow right iconDevelopment Environment Setup

For local environment setup, follow Local Setup Guide.

Credential Configuration

Follow the Secret Setup Guide

SCIM Connector Project Configuration

Check SCIM Connector Project Configuration for more details of the application configuration files.

IDP and Fluent Configuration

Add the necessary IDP and Fluent settings to allow the connector to function properly


Step arrow right iconPre-Production and Production Environment Setup

The deployment steps covered here are guidelines and should not be taken to the letter as every company has different security policies, deployment, and monitoring processes. This is not a comprehensive or complete tutorial on deploying and running containers.

Building the Project

The project provides a script that builds the Java artifact and generates a docker image that can be deployed on any environment. The container expects certain variables that allow the same image to be used in different environments.

1 ./build.sh

Language: sh

Name: Build a docker image

Description:

[Warning: empty required content area]

A docker image named fluent_connector_scim should be available at the build server if all goes well. At this point, the container image should be published to an image repository like AWS ECR.

Verifying it works

It is possible to run the connector on any machine with docker and docker-compose installed. The steps below show how to have the container built and running.

1# Builds the containers 
2docker-compose -f docker-compose.yml build
3# Runs the containers and their logs will be visible on the terminal. To have the containers running in the background, include '-d' at the end of the command line. Note that this will not give you logs at the terminal, use docker -logs <container>. 
4docker-compose -f docker-compose.yml up

Language: sh

Name: Build & run the containers

Description:

[Warning: empty required content area]

Deploying

As part of the project, it included a sample CloudFormation template that can create a stack with all that is required and deploy the container image. For more information, see Cloud Formation Template.

Please note the configuration steps required for setting up the credentials.


Fluent Commerce staff

Fluent Commerce staff

Copyright © 2024 Fluent Retail Pty Ltd (trading as Fluent Commerce). All rights reserved. No materials on this docs.fluentcommerce.com site may be used in any way and/or for any purpose without prior written authorisation from Fluent Commerce. Current customers and partners shall use these materials strictly in accordance with the terms and conditions of their written agreements with Fluent Commerce or its affiliates.

Fluent Logo