How to transform v1.0 manifest into the manifest v2.0
Essential knowledge
Author:
Fluent Commerce
Changed on:
1 July 2024
Overview
This article explains how to transform manifests v1.0 into the new manifests v2.0. From this guide, you will learn how to configure manifest with necessary menu items, add filters and configure them, and add custom components. The examples below demonstrate the following Fluent OMS menu items:- Orders
- Roles & Permissions
- Settings
Key points
- Admin Console Vs Fluent OMS Manifests
- How to add a component to a tab
- How to add a filter and exclude filters that should not be displayed on
- How to add breadcrumbs
- How to set the default page size
- How to add Mutations and UserActions
- How to add components to a card
- How to add components to a list
- How to configure navigation from Dashboard to the page with applying date and time range filter
Admin Console Vs Fluent OMS Manifests
Manifest
| Admin Console | Fluent OMS |
Complex manifest document which contains all application structure (`ADMIN_CONSOLE_MANIFEST`). | Main manifest (`fc.mystique.manifest.oms`) and smaller fragment settings(`fc.mystique.manifest.oms.fApplication modulesment.ordermanagement`). |
Application Modules
| Admin Console | Fluent OMS |
New modules are added in one complex manifest. Marked JSON fragment is used to add new module to the application and display it in the side navigation.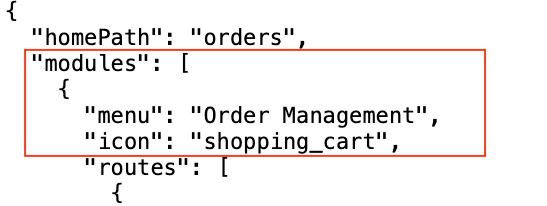 | 1. New modules are added via fragments in the main manifest. See the example below: 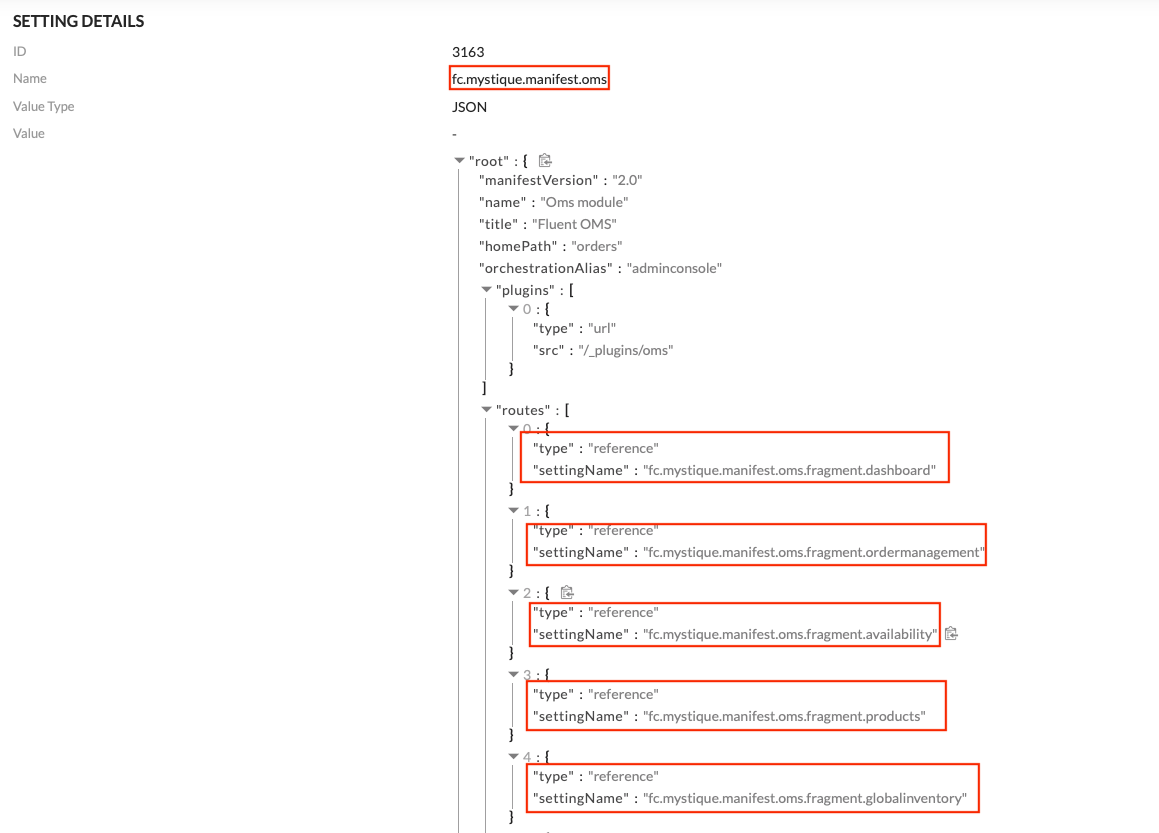 2. Marked JSON fragment from `fc.mystique.manifest.oms.fragment.ordermanagement` is used to display new module in the side navigation.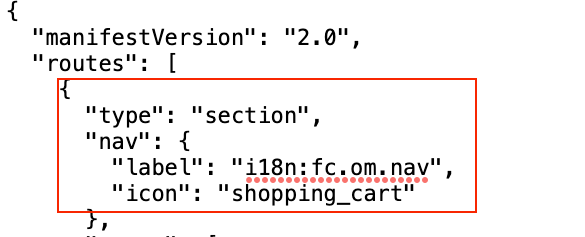 3. i18n support for labels is added. Label format is 3. i18n support for labels is added. Label format is `i18n:fc.om.nav`. |
Menu item
| Admin Console | Fluent OMS |
Marked JSON fragment from `ADMIN_CONSOLE_MANIFEST` is used to add new menu items to the side navigation.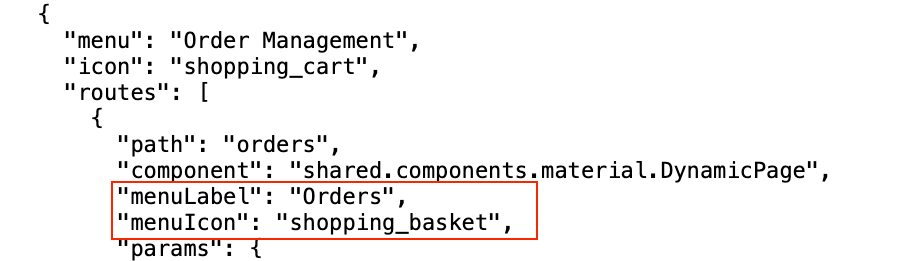 | Marked JSON fragment from `fc.mystique.manifest.oms.fragment.ordermanagement` is used to add new menu item to the side navigation. |
Add Page
| Admin Console | Fluent OMS |
Example of adding a page in `ADMIN_CONSOLE_MANIFEST`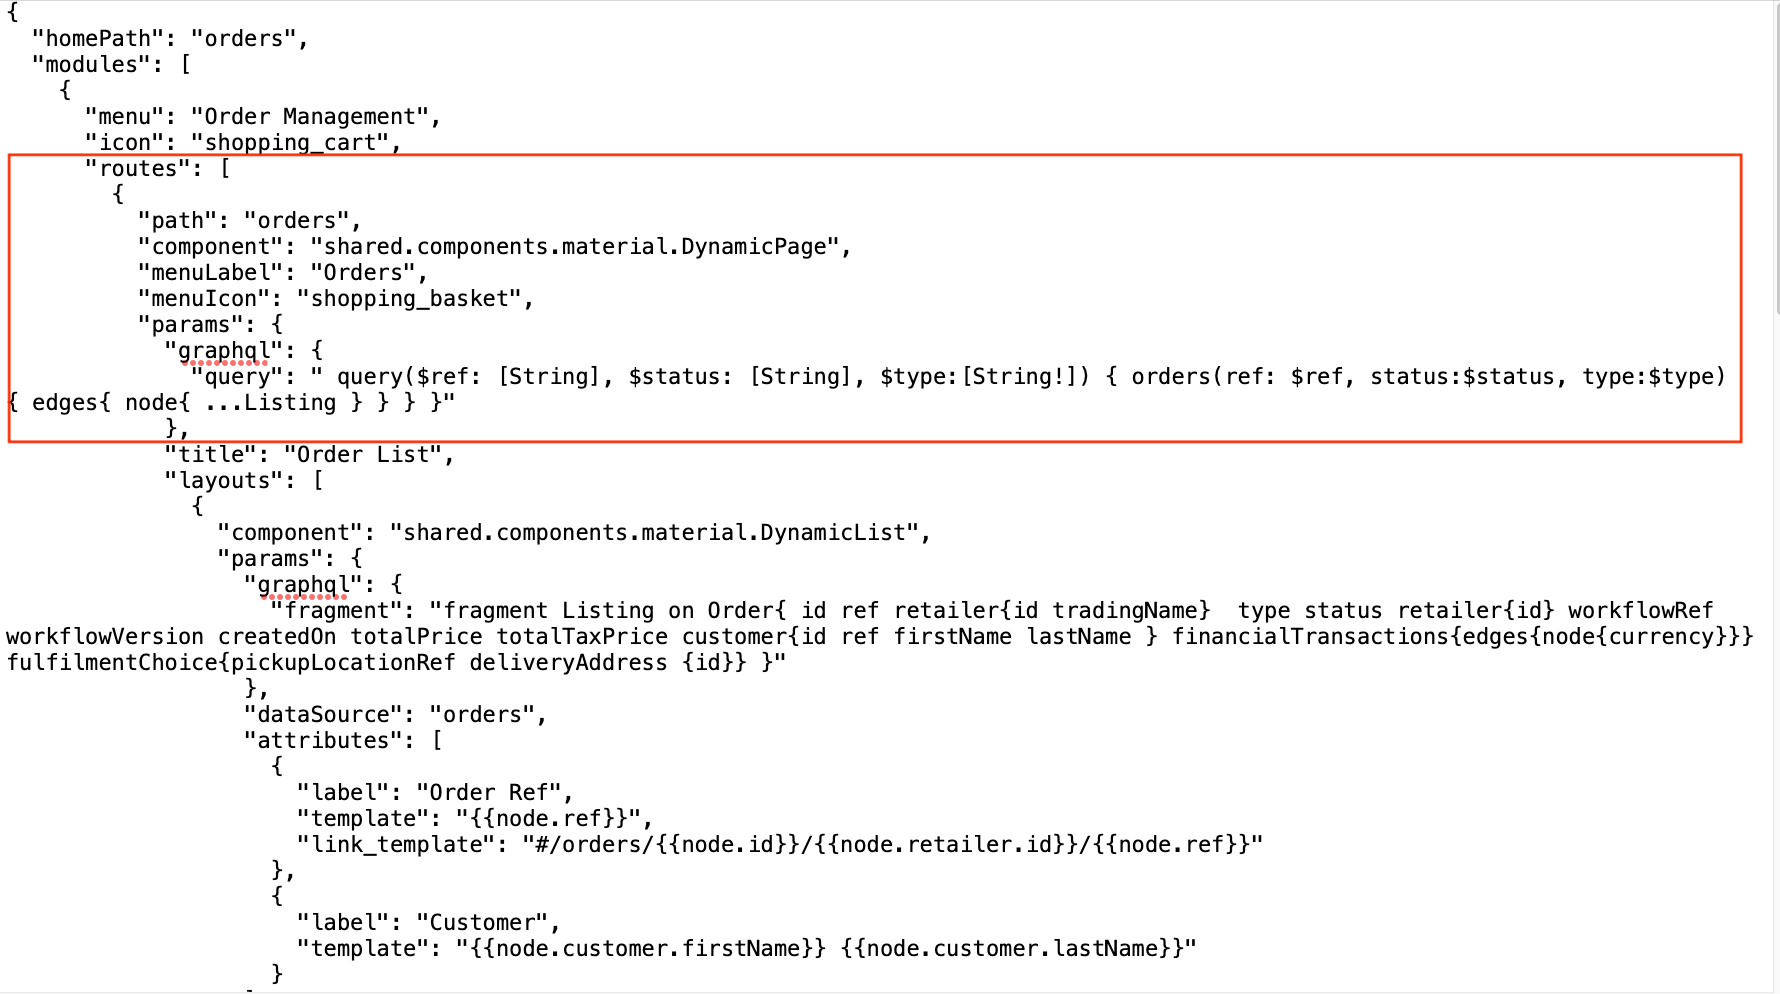 | 1. To add required pages, add key word pages which contains an array and add to this array all pages you need.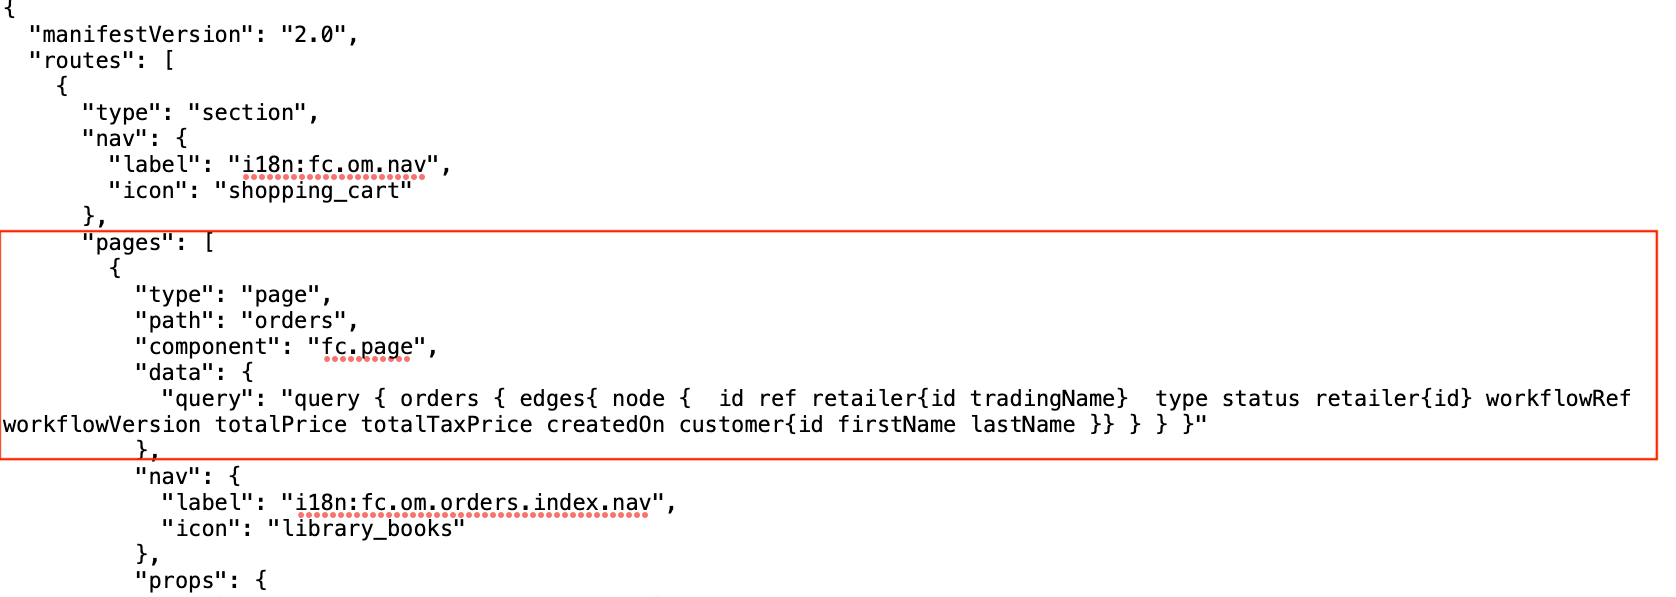 2 . Indicate the following data: - type - path - component ( `fc.page`)3. To set a title it, add `"props":`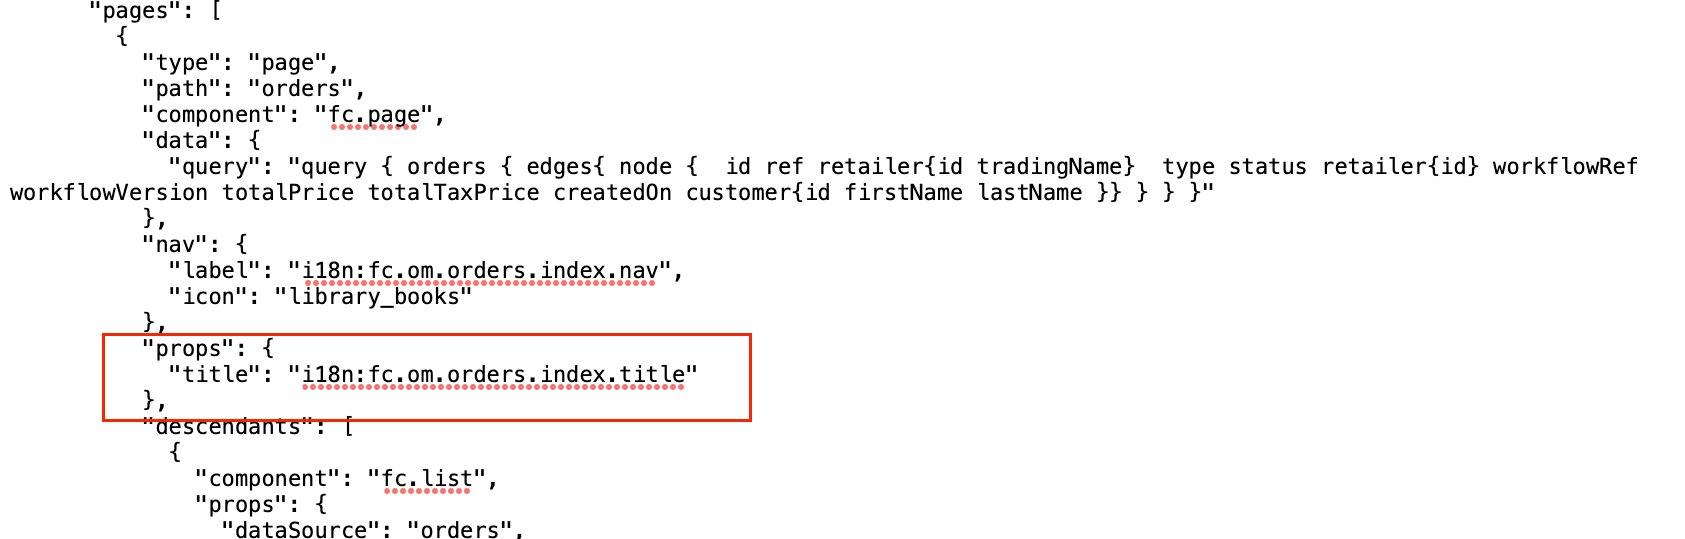 |
Query
| Admin Console | Fluent OMS |
In the manifest v1.0 (`ADMIN_CONSOLE_MANIFEST` it was possible to divide query into several parts (fragments).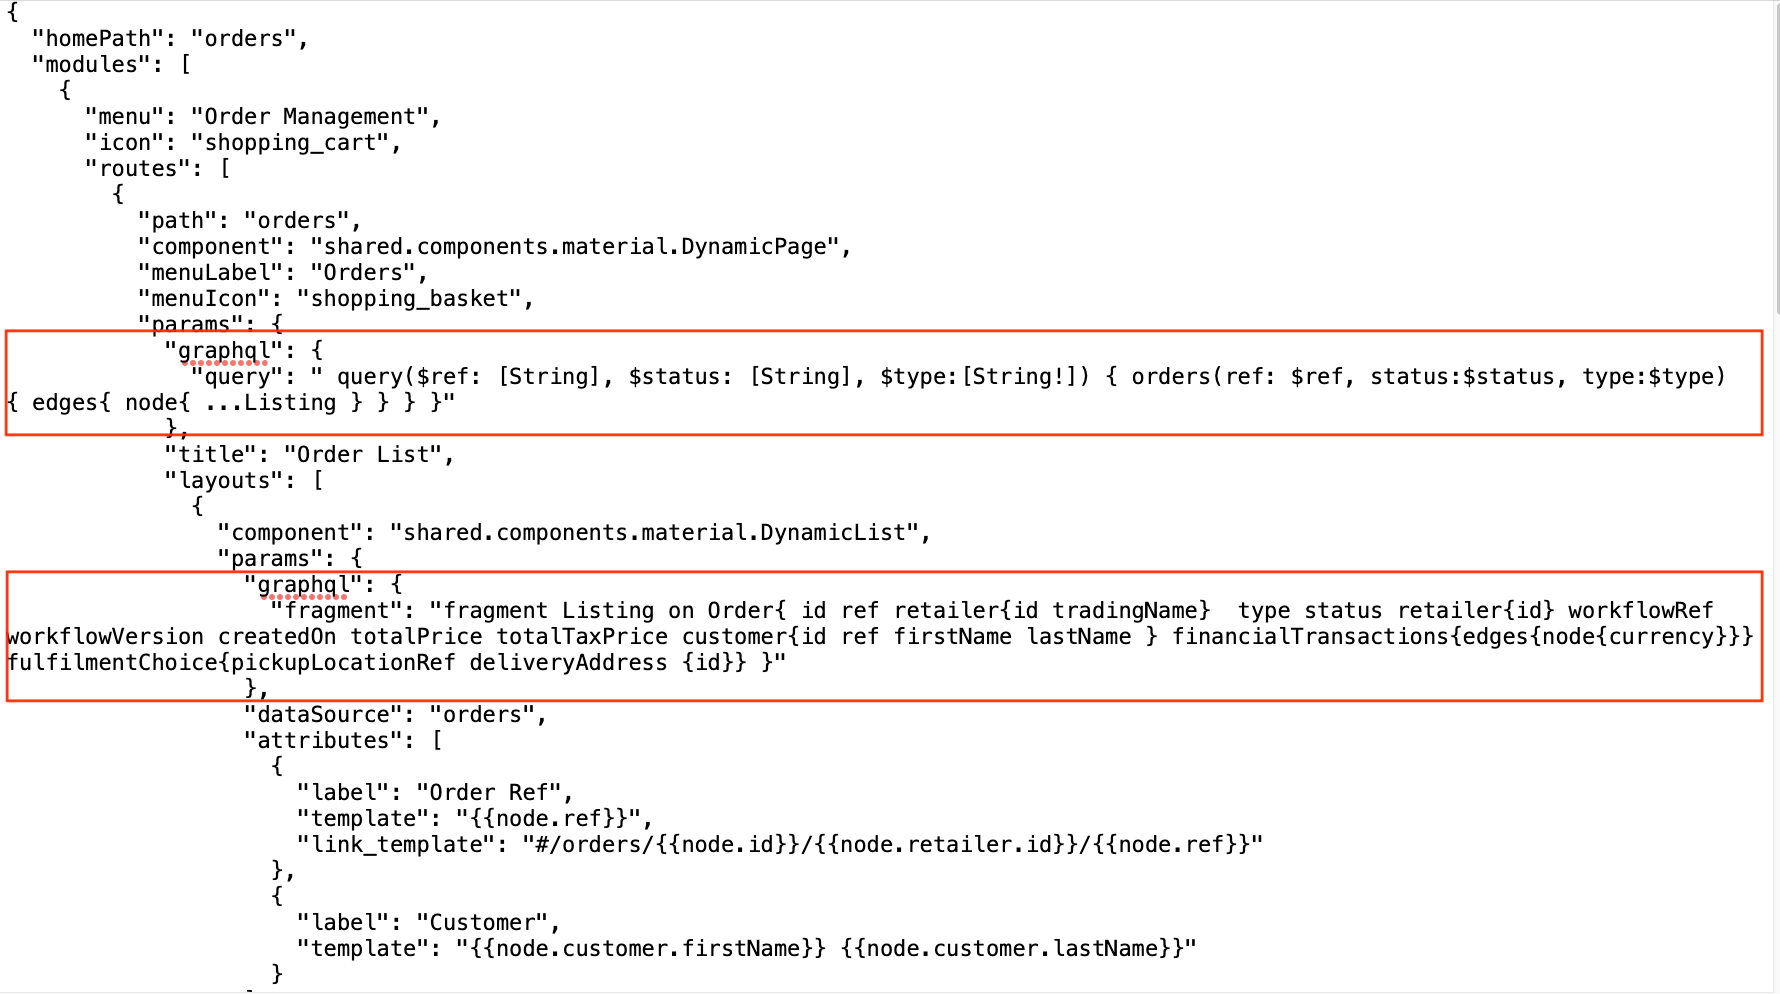 | In the new v2.0 manifest, the query cannot be divided into fragments, it should be a single.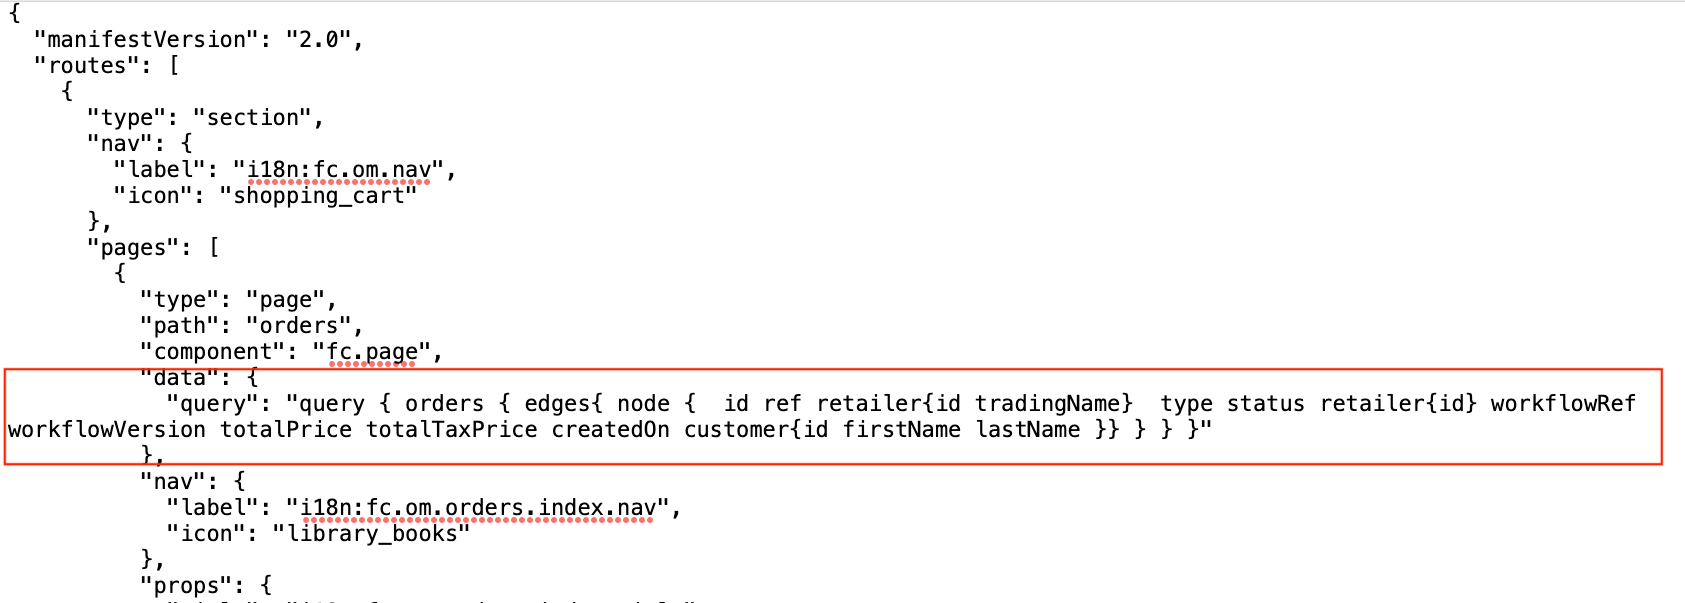 All pages uses GraphQL queries to display information. All pages uses GraphQL queries to display information.To add query to the page follow next steps: - Add `"data":` and put inside key word `"query":`.- GraphQL query should be added after the key word. See the example in the JSON fragment above. |
Table
| Admin Console | Fluent OMS |
To display data in the table fragment of the query can be used.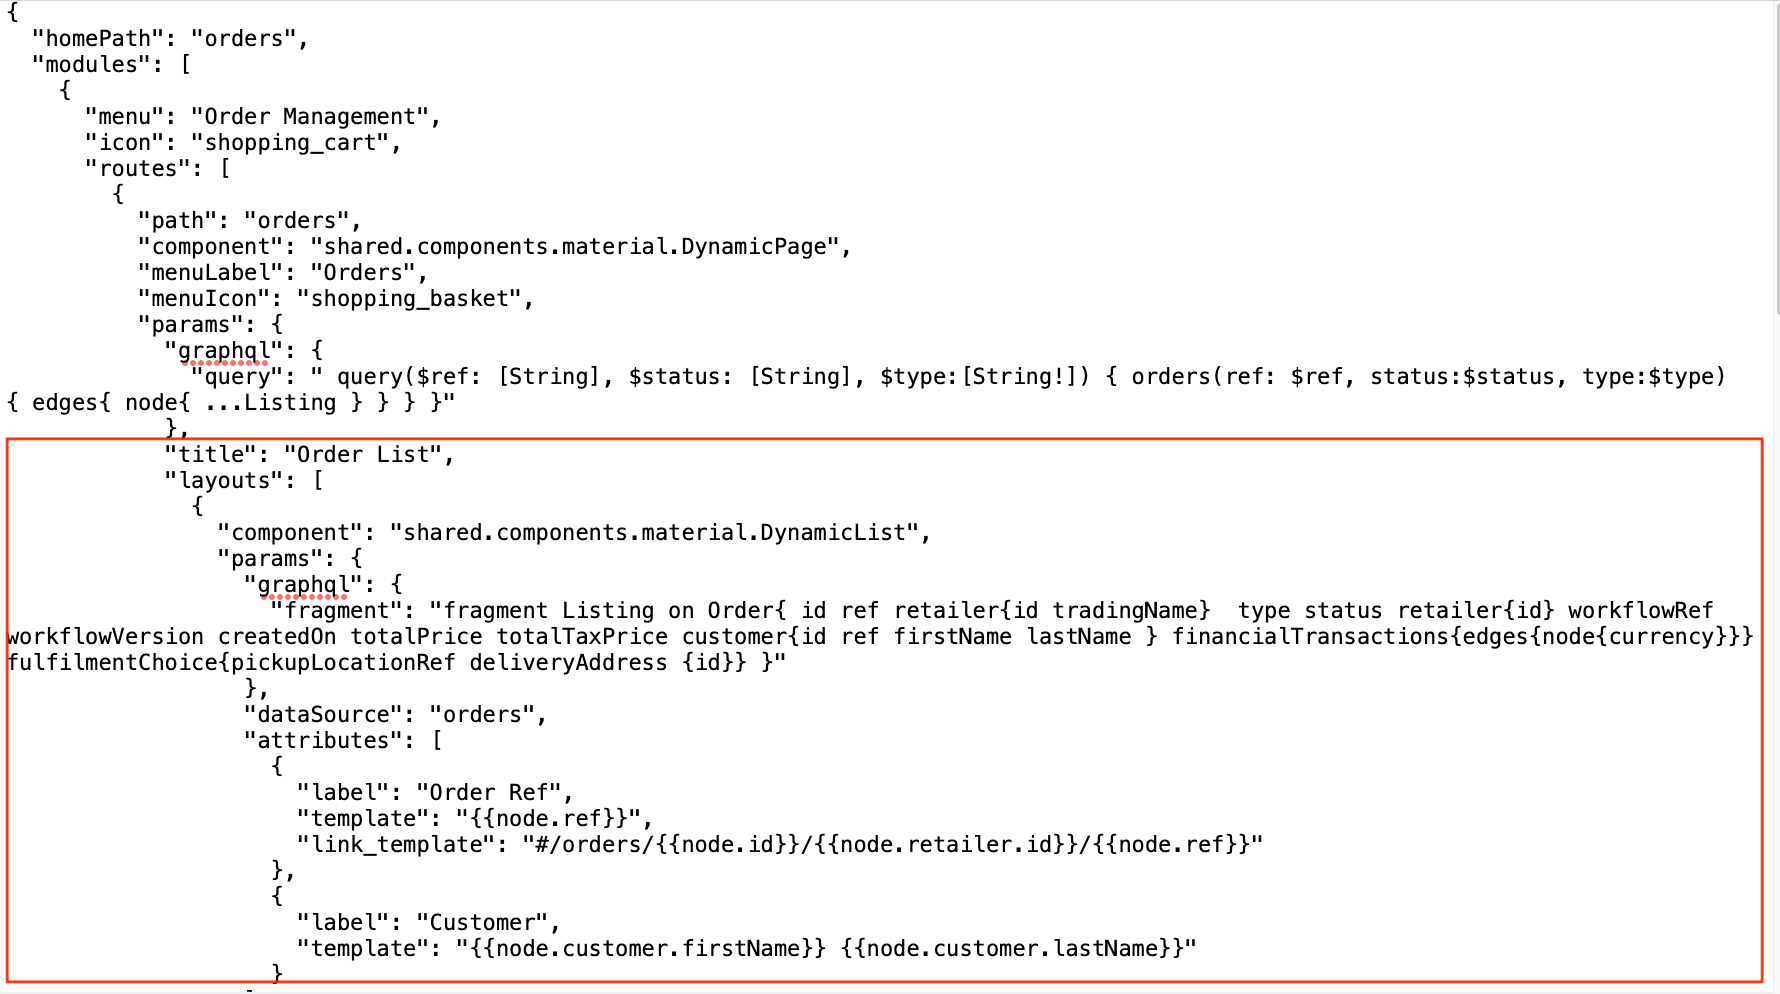 | 1. To add a table to a page it is, use descendants - child element of a page.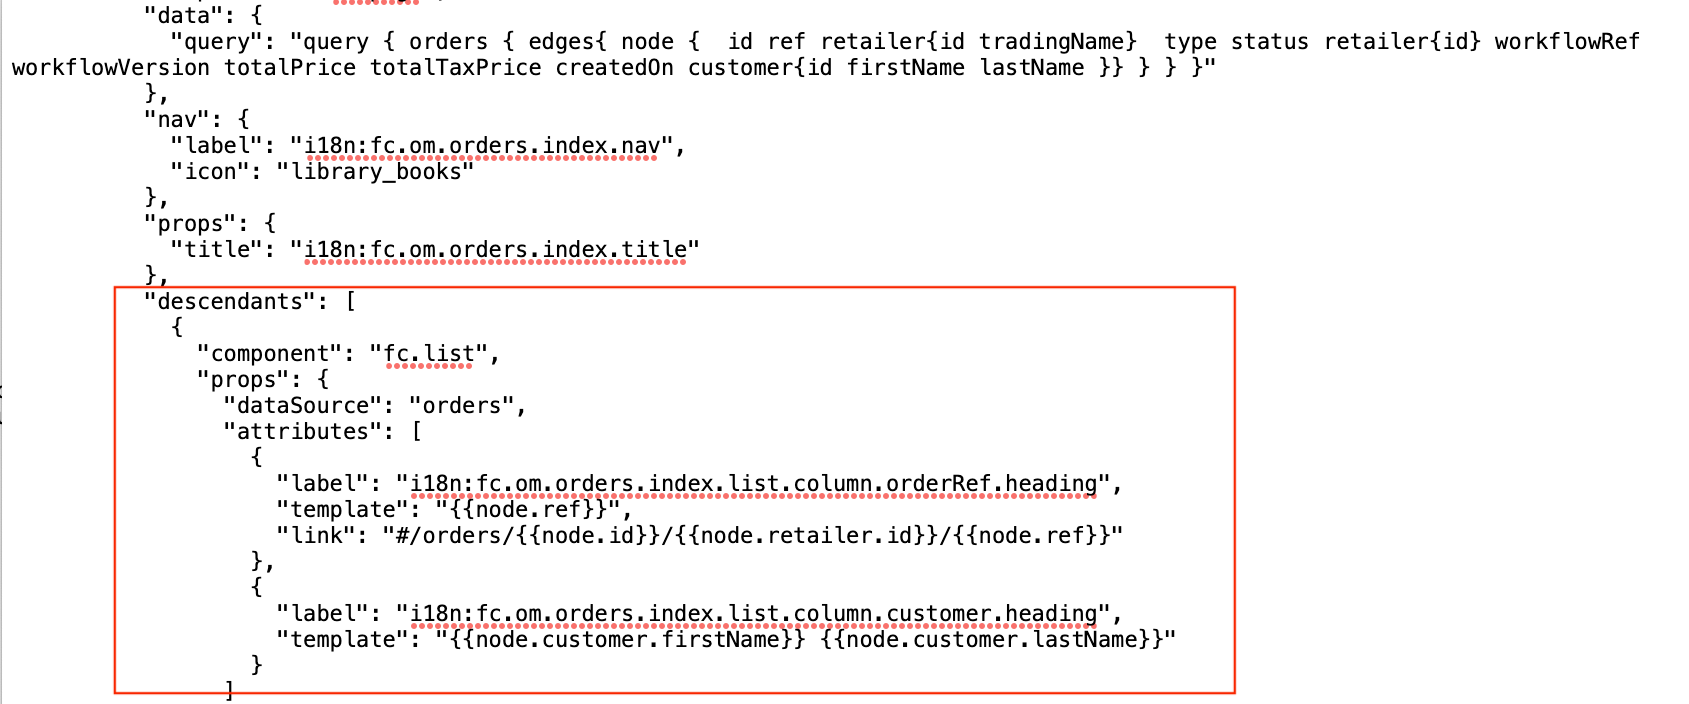 2. Indicate the following data: - component (fc.list) - props 3. Props contains: `dataSource` (put data from the query) and `attributes`(an array which contains table’s columns).4. Each column describes the following way: `"label":` - the name of a column;`"template":` - dynamic value from the query, e.g., {{node.ref}} .In case the value in a column is a link to another page `"link":` parameter should be added to the `"attributes":` . |
Link To Another Page
| Admin Console | Fluent OMS |
To add a link to the data in a column `"link_template":` is used. The format of a link is marked in the JSON fragment below.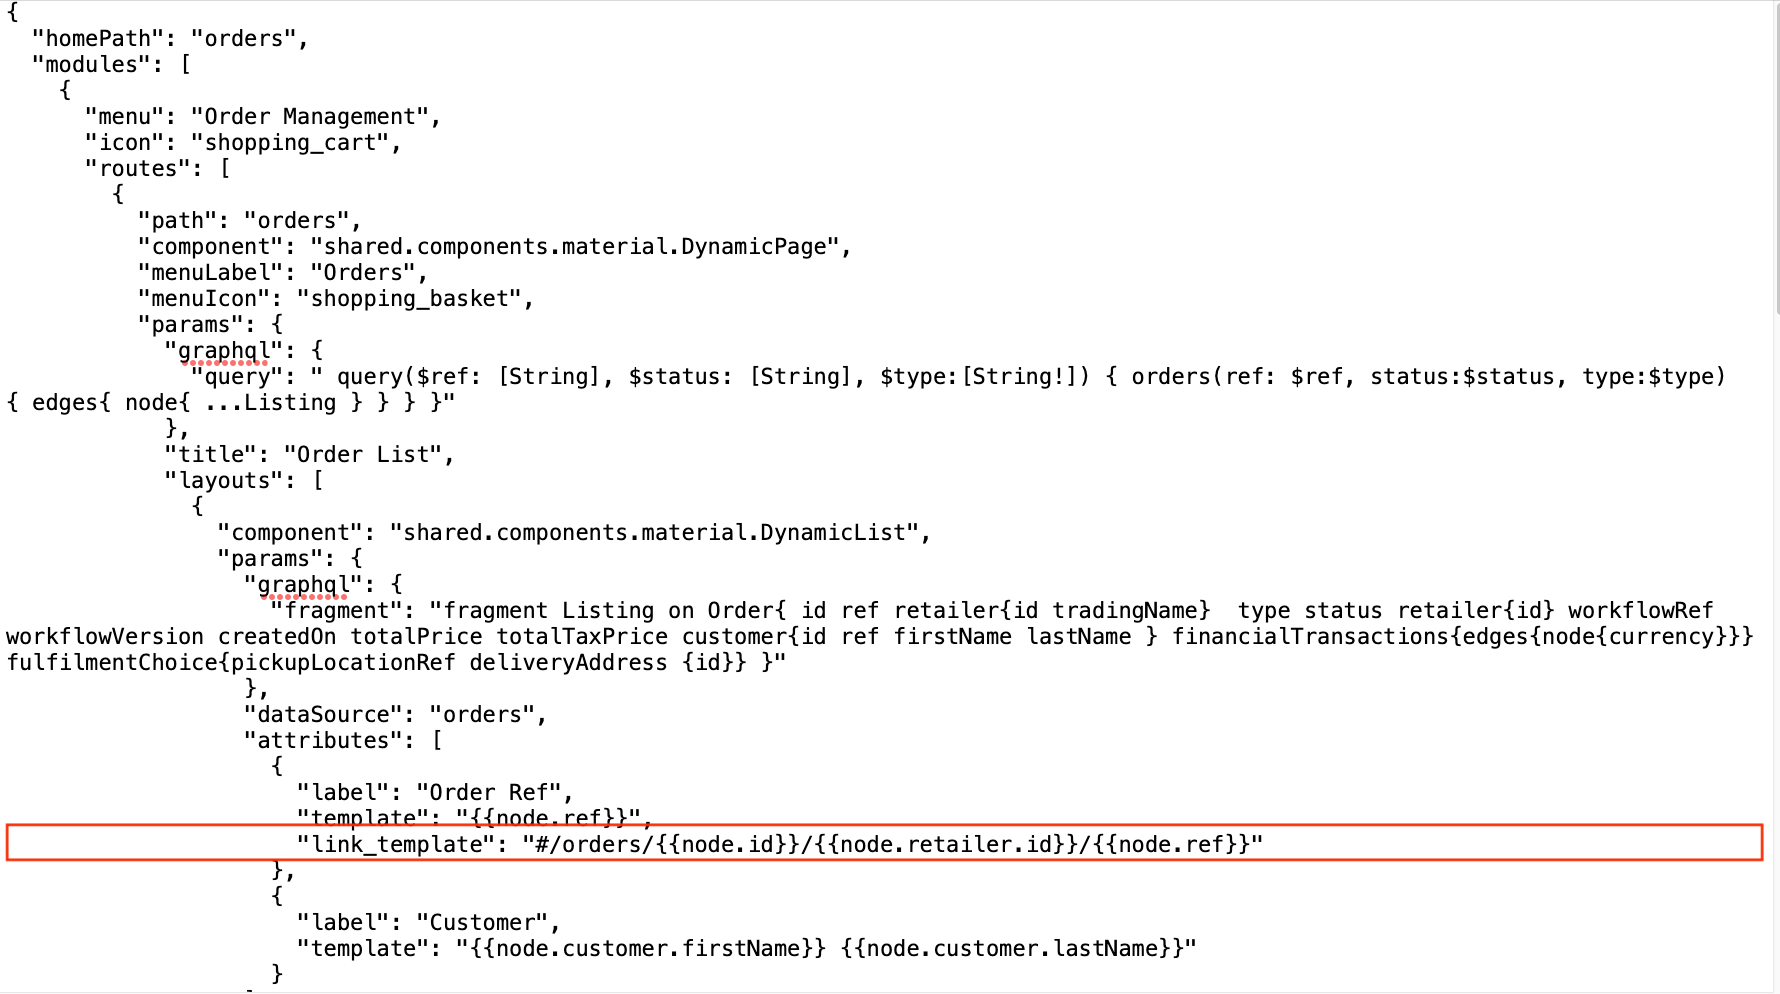 | To add a link to the data in a column it is, use `"link":` . The format of a link is marked in the JSON fragment below.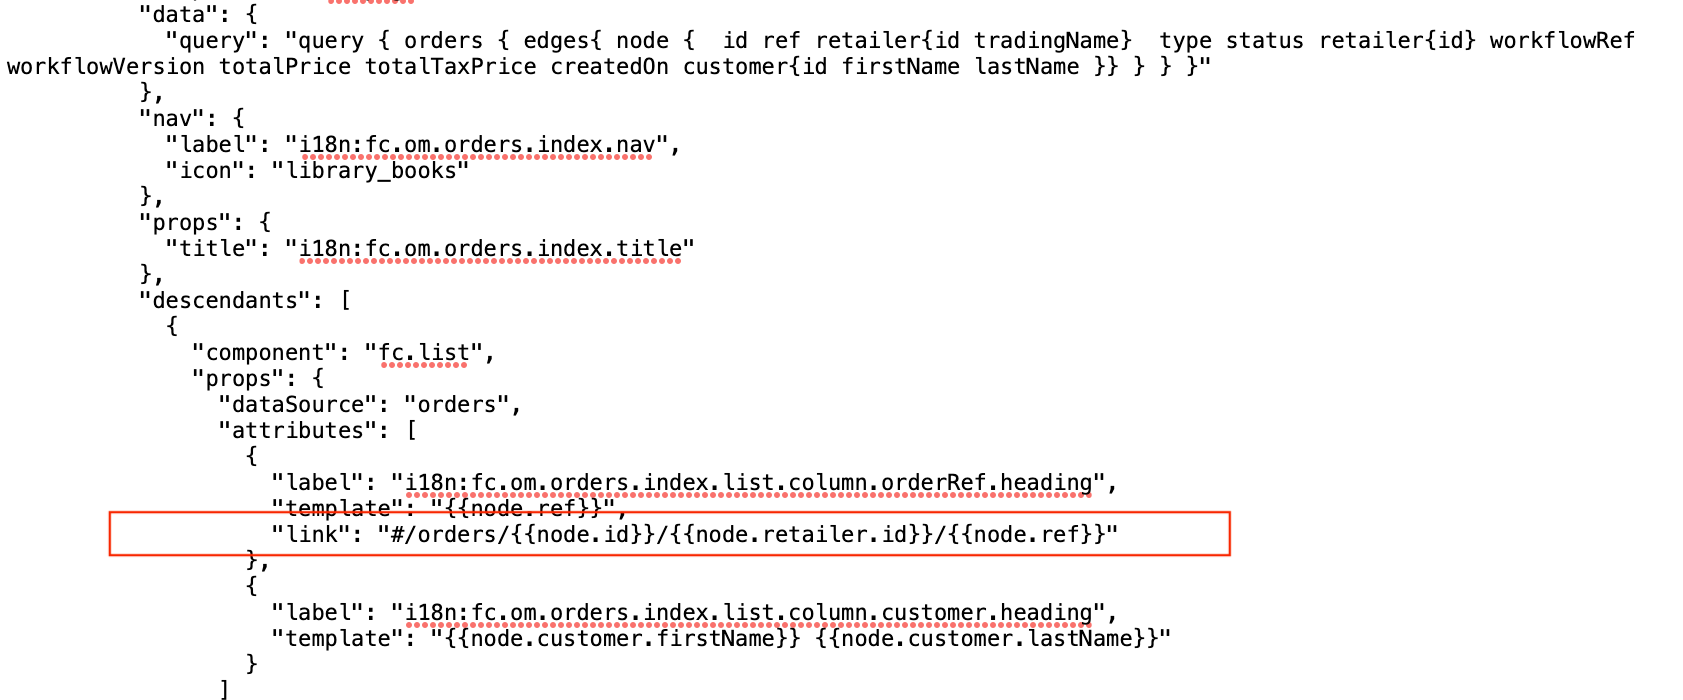 |
Details Page with Tab
| Admin Console | Fluent OMS |
Tab is added via `"layouts":`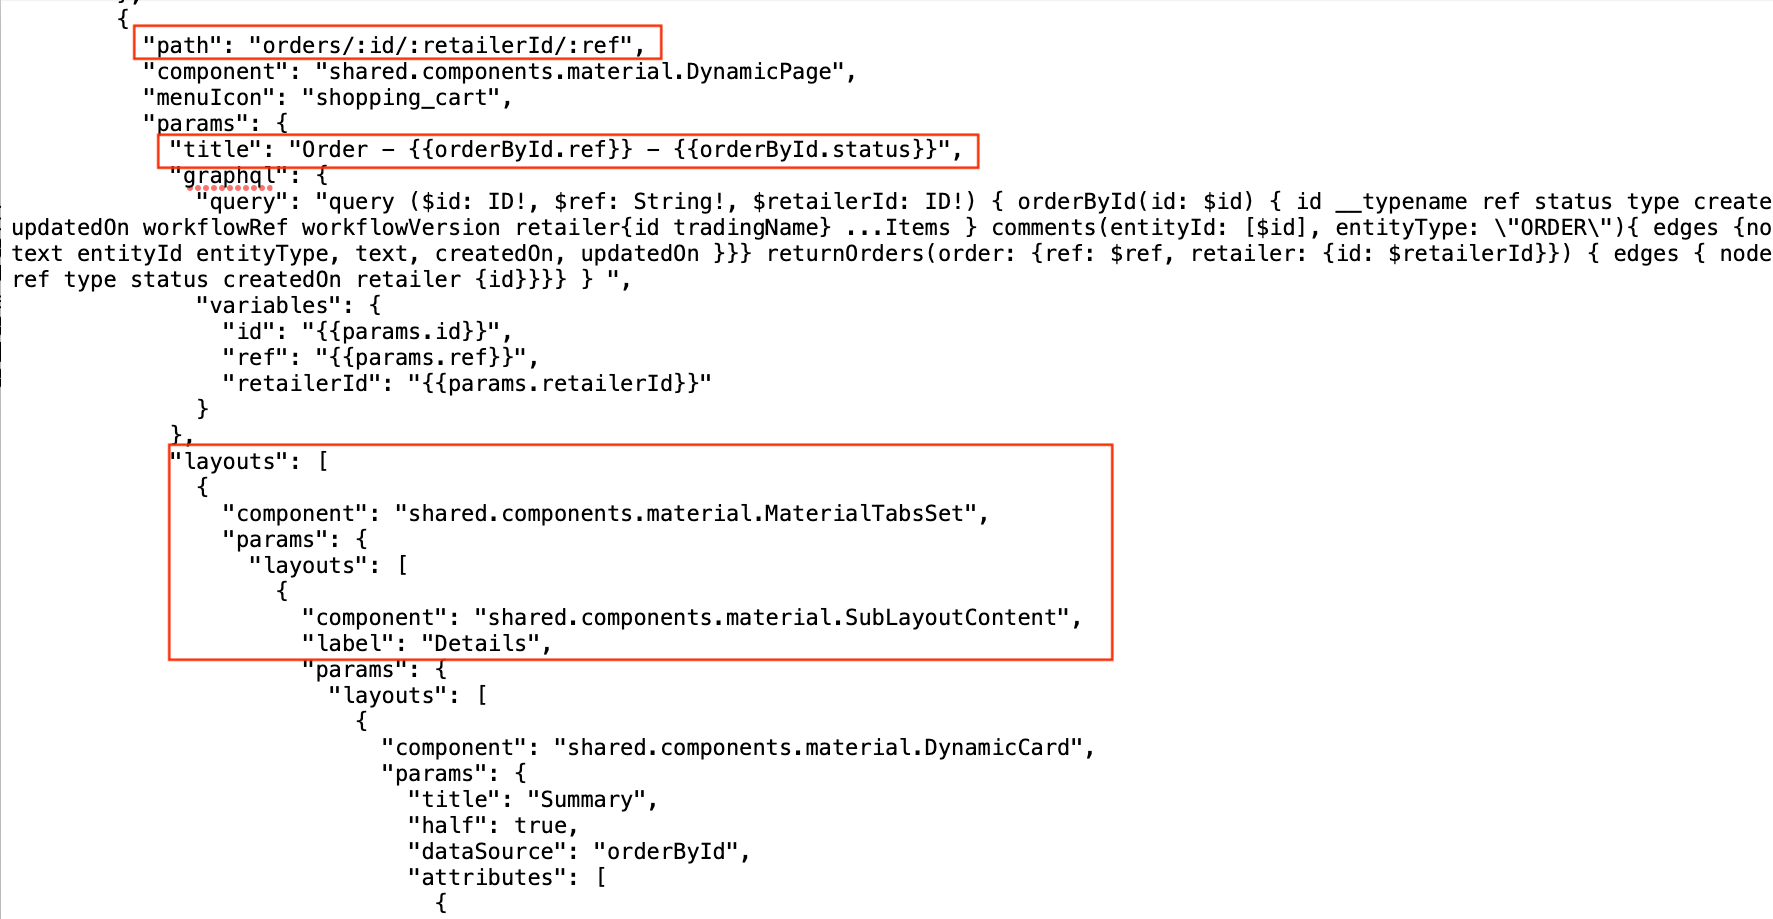 | 1. To add details page with a tab indicate: - type ( `"page"`)- path (should be equal to `"link":`)- component `(“fc.page"`)- data `(“query"` and `“variable"`, which are taken from URL)2 . Title is indicated in “ `props":`To make title dynamic data should be taken from query, e.g., `"props": {``"title": "{{orderById.ref}} - {{orderById.status}}"``},`3. Use descendants to add a tab: `"descendants": [``{ "component": "fc.tabs",``"props":``{ "layouts": [``{ "label": "i18n:fc.om.orders.detail.tab.details.label" } ] },`Example of details page with added tab: 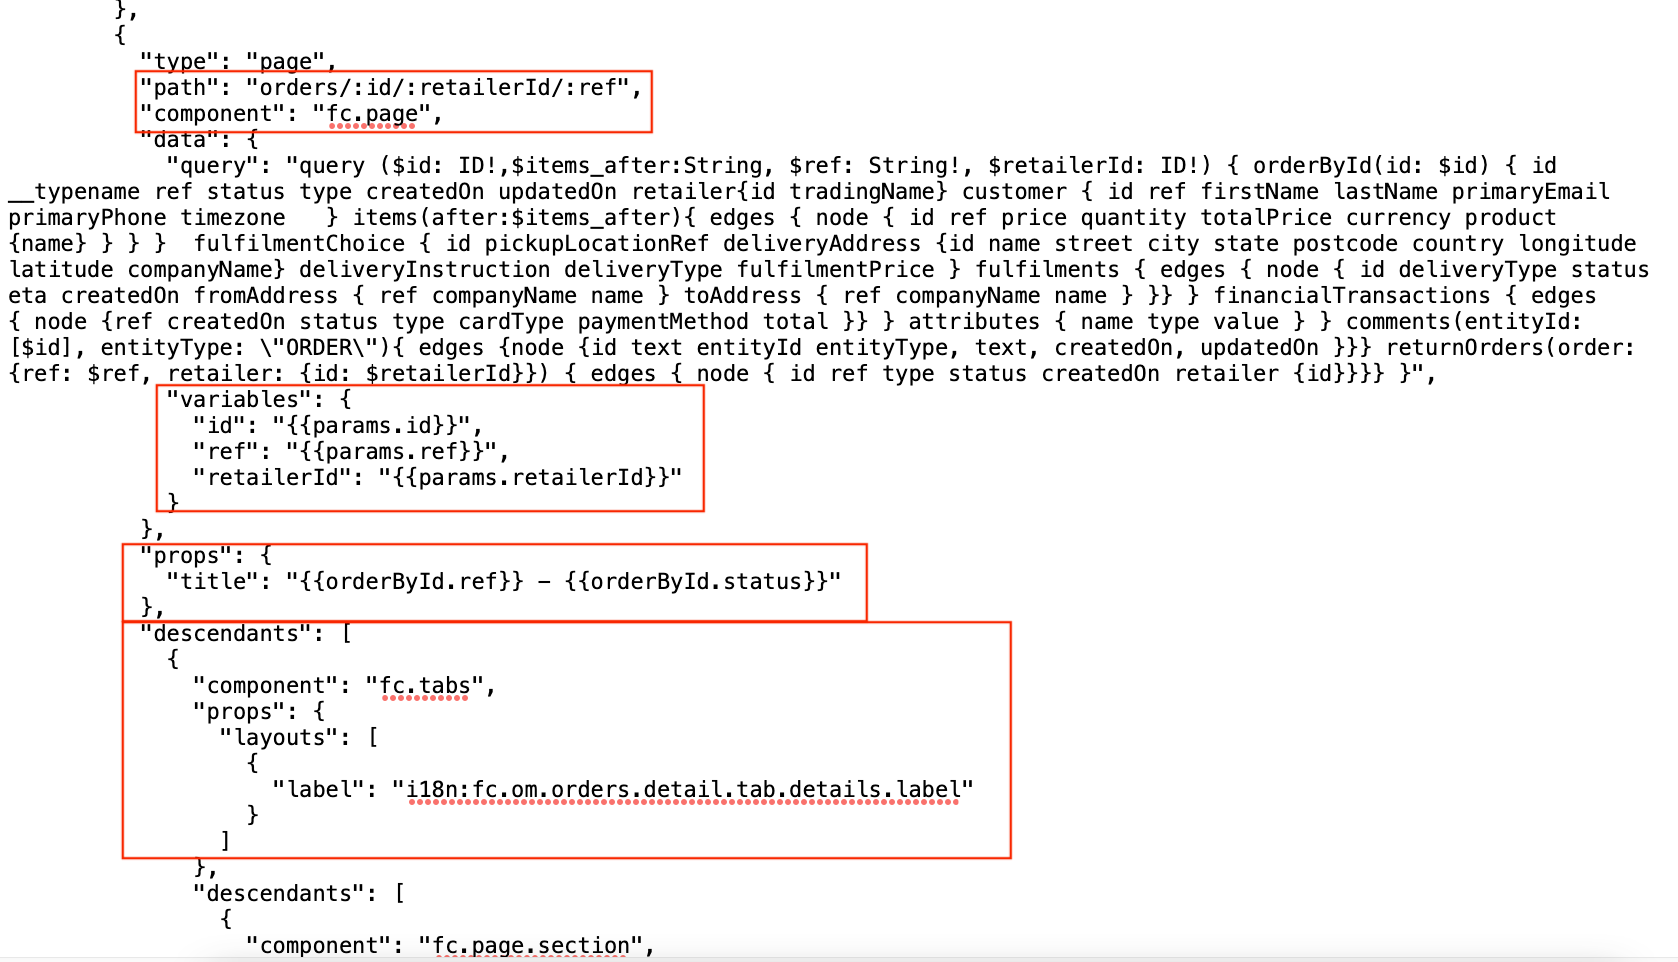 |
Details page with card and table in the tab
| Admin Console | Fluent OMS |
1. Details page with a tab and a card on it: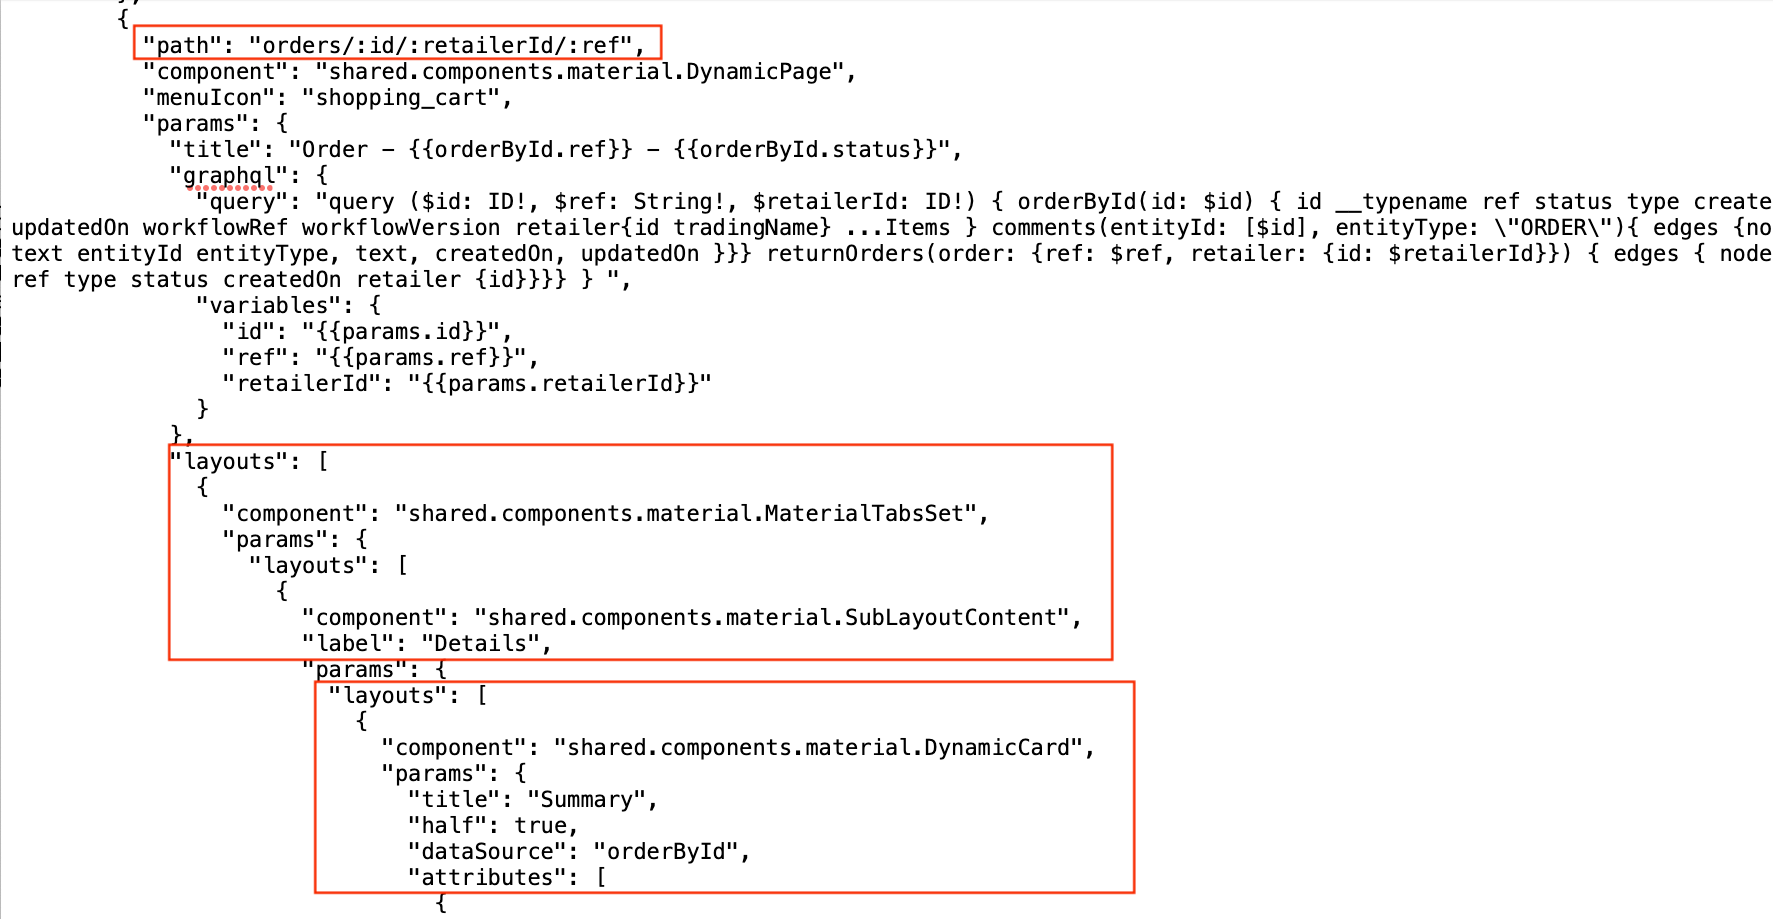 2. Tab with a card and a table: 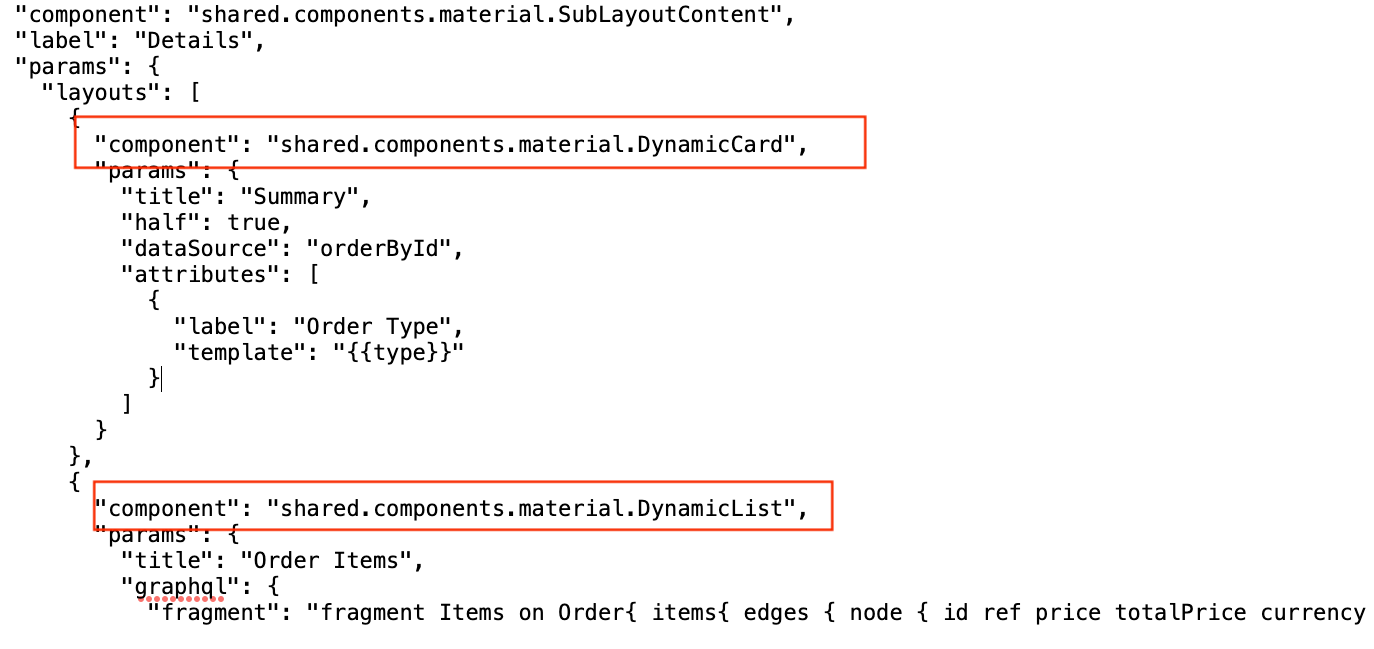 | 1. To add card or table to the tab it is, use a new descendant - add to it new component ( `fc.page.section`) with its descendants:- use `fc.card.attribute` to add a tab- use `fc.list` to add a table 2. The following properties should be indicated for `fc.card.attribute` component:- title - width - dataSource - attributes 3. The following properties should be indicated for `fc.list` component:- title - dataSource - attributes |
How to add a component to a tab
To add a component to a tab, utilise`“descendants":` and indicates the following:- component
- dataSource
- props
1{
2  "type": "page",
3  "path": "orders/:id/:retailerId/:ref",
4  "component": "fc.page",
5  "descendants": [
6    {
7      "component": "fc.tabs",
8      "props": {
9        "layouts": [
10          {
11            "label": "i18n:fc.om.orders.detail.tab.activity.label"
12          }
13        ]
14      },
15      "descendants": [
16        {
17          "component": "fc.page.section",
18          "descendants": [
19            {
20              "component": "fc.activity.entity",
21              "dataSource": "orderById",
22              "props": {
23                "width": "12",
24                "showChildEntities": true
25              }
26            }
27          ]
28        }
29      ]
30    }
31  ]
32}How to add a filter and exclude filters that should not be displayed on
To add a filter to a table one needs to add to`"props":` filter and set the value `enabled` into true. In case `enabled` is set to false, filters will not be displayed.Parameters with types that don't have a matching field implementation are excluded, along with any listed in the explicit "exclude" config option.See the example below:1{
2 "type": "page",
3 "path": "orders",
4 "component": "fc.page",
5 "descendants": [
6 {
7 "component": "fc.list",
8 "props": {
9 "dataSource": "orders",
10 "filter": {
11 "enabled": true,
12 "exclude": [
13 "workflowRef",
14 "workflowVersion",
15 "totalPrice",
16 "totalTaxPrice"
17 ]
18 }
19 }
20 }
21 ]
22}Problem:Some parameters are not displayed in a filter.Provided:
1query ($ref: [String], $status: [String], $type: [String!]) {
2  orders(ref: $ref, status: $status, type: $type) {
3    edges {
4      node {
5        id
6        ref
7        retailer {
8          id
9          tradingName
10        }
11        type
12        status
13        retailer {
14          id
15        }
16        workflowRef
17        workflowVersion
18        totalPrice
19        totalTaxPrice
20        customer {
21          id
22          firstName
23          lastName
24        }
25      }
26    }
27  }
28}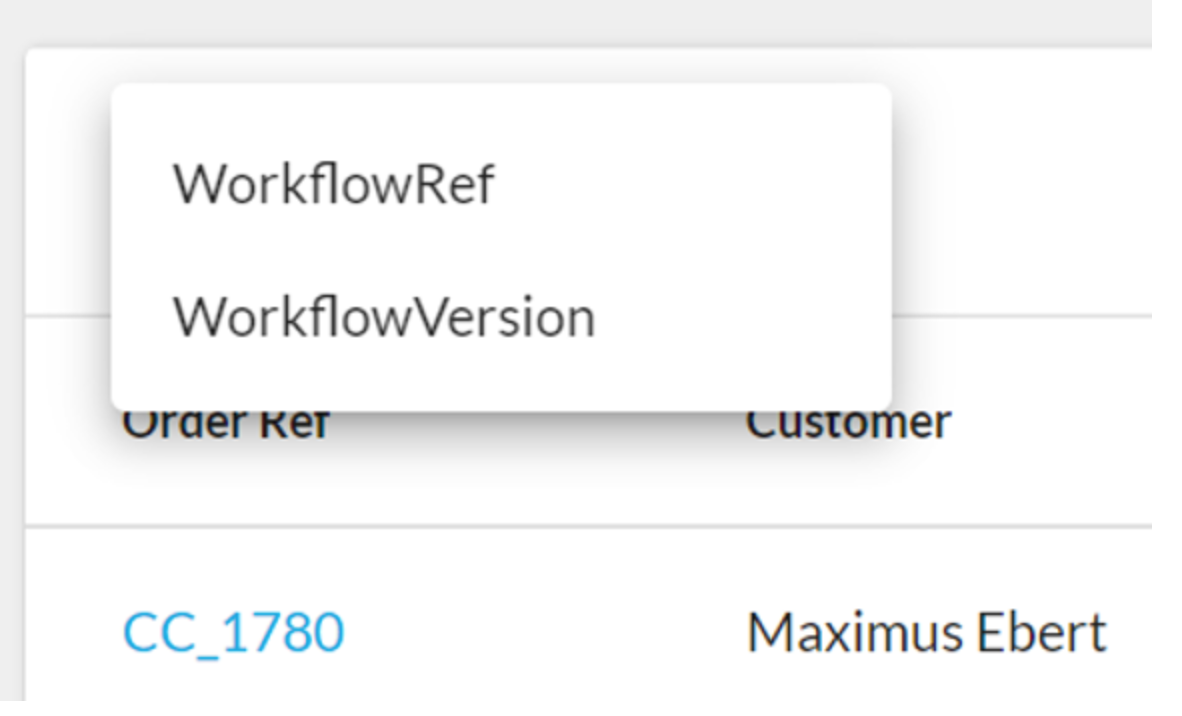
List of displayed filters
Solution:If a parameter is deleted from the query it appears in the filter list.1query ($status: [String], $type: [String!]) {
2 orders(status: $status, type: $type) {
3 …
4}
5}`$ref` parameter is deleted and after it appears in the filter list.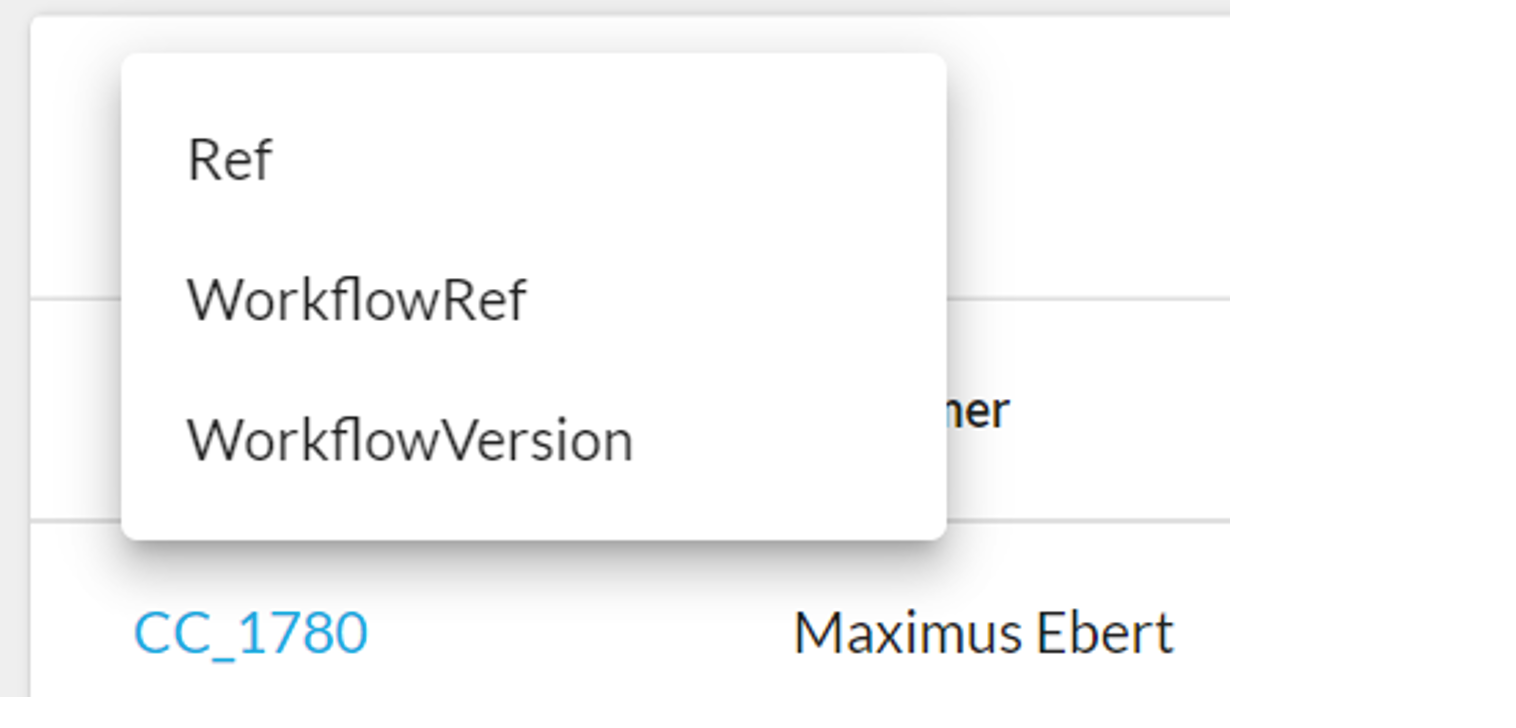
How to add breadcrumbs
To add breadcrumbs to a page one needs to add to props`"backButtons":` array which contains:- path
- menuLabel
1{
2  "type": "page",
3  "path": "orders/:id/:retailerId/:ref",
4  "component": "fc.page",
5  "props": {
6    "backButtons": [
7      {
8        "path": "orders",
9        "menuLabel": "i18n:fc.om.orders.detail.breadcrumb.backToOrders"
10      },
11      {
12        "path": "customers/{{orderById.customer.id}}/{{orderById.customer.ref}}",
13        "menuLabel": "i18n:fc.om.orders.detail.breadcrumb.viewCustomer"
14      }
15    ]
16  }
17}How to set the default page size
To set default page size one needs to make changes in the query and add`“variables":`For more information see the examples below:1{
2 "type": "page",
3 "path": "orders",
4 "component": "fc.page",
5 "data": {
6 "query": "query($orders_first: Int) { orders(first: $orders_first) { edges{ node { id ref retailer{id tradingName} type status retailer{id} workflowRef workflowVersion totalPrice totalTaxPrice createdOn customer{id firstName lastName }} } } }",
7 "variables": {
8 "orders_first": 100
9 }
10 }
11}How to add Mutations and UserActions
1{
2  "type": "page",
3  "path": "orders",
4  "component": "fc.page",
5  "data": {
6    "query": "query($orders_first: Int) { orders(first: $orders_first) { edges{ node {  id ref retailer{id tradingName}  type status retailer{id} workflowRef workflowVersion totalPrice totalTaxPrice createdOn customer{id firstName lastName }} } } }",
7    "variables": {
8      "orders_first": 100
9    }
10  }
11}`fc.list` props. Actions can be primary or secondary: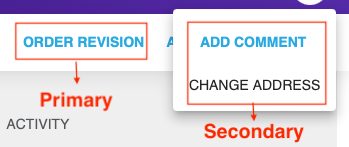 For UserAction
 `type` and `name` should be indicated in the array, e.g. 1"type": "userAction",
2"name": "OrderAddressChange",`overrides` should be used, e.g.,1"overrides": {
2 "deliveryAddress": {
3 "defaultValue": {
4 "companyName": "{{orderById.fulfilmentChoice.deliveryAddress.companyName}}",
5 "name": "{{orderById.fulfilmentChoice.deliveryAddress.name}}",
6 "street": "{{orderById.fulfilmentChoice.deliveryAddress.street}}",
7 "city": "{{orderById.fulfilmentChoice.deliveryAddress.city}}",
8 "postcode": "{{orderById.fulfilmentChoice.deliveryAddress.postcode}}",
9 "state": "{{orderById.fulfilmentChoice.deliveryAddress.state}}",
10 "country": "{{orderById.fulfilmentChoice.deliveryAddress.country}}"
11 }
12 }
13 }`type`, `label` and `name` should be indicated in the primary or secondary array, e.g.,1"primary" : [
2 {
3 "type": "mutation",
4 "label": "i18n:fc.om.orders.detail.userAction.createOrder",
5 "name": "createOrder"
6 }
7],`overrides` should be used, e.g.,1 "overrides": {
2 "entityId": {
3 "defaultValue": "{{orderById.id}}"
4 },
5 "entityType": {
6 "defaultValue": "i18n:fc.om.orders.index.userAction.entityType.order"
7 }
8 }Also, overrides should be used in situations when one needs to add component to the mutations form (drawer). In the example below you can find the example of
`adding fc.attribute.jsoneditor` component to the Edit Setting drawer.1{
2 "type": "page",
3 "path": "settings/:id",
4 "component": "fc.page",
5 "props": [
6 {
7 "actions": {
8 "primary": [
9 {
10 "type": "mutation",
11 "label": "i18n:fc.admin.settings.index.userAction.updateSetting",
12 "name": "updateSetting",
13 "args": {
14 "id": "{{setting.id}}"
15 },
16 "overrides": {
17 "lobValue": {
18 "component": "fc.attribute.jsoneditor"
19 }
20 }
21 }
22 ]
23 }
24 }
25 ]
26}1{
2 "type": "page",
3 "path": "orders/:id/:retailerId/:ref",
4 "component": "fc.page",
5 "props": {
6 "actions": {
7 "primary" : [
8 {
9 "type": "mutation",
10 "label": "i18n:fc.om.orders.detail.userAction.createOrder",
11 "name": "createOrder"
12 }
13 ],
14 "secondary": [
15 {
16 "type": "mutation",
17 "label": "i18n:fc.om.orders.detail.userAction.addComment",
18 "name": "createComment",
19 "overrides": {
20 "entityId": {
21 "defaultValue": "{{orderById.id}}"
22 },
23 "entityType": {
24 "defaultValue": "i18n:fc.om.orders.index.userAction.entityType.order"
25 }
26 }
27 },
28 {
29 "type": "userAction",
30 "name": "OrderAddressChange",
31 "overrides": {
32 "deliveryAddress": {
33 "defaultValue": {
34 "companyName": "{{orderById.fulfilmentChoice.deliveryAddress.companyName}}",
35 "name": "{{orderById.fulfilmentChoice.deliveryAddress.name}}",
36 "street": "{{orderById.fulfilmentChoice.deliveryAddress.street}}",
37 "city": "{{orderById.fulfilmentChoice.deliveryAddress.city}}",
38 "postcode": "{{orderById.fulfilmentChoice.deliveryAddress.postcode}}",
39 "state": "{{orderById.fulfilmentChoice.deliveryAddress.state}}",
40 "country": "{{orderById.fulfilmentChoice.deliveryAddress.country}}"
41 }
42 }
43 }
44 }
45 ]
46 }
47 }
48}
How to add components to a card
To add a component to a card one needs to add to the `"attributes":` type and options. In options, the following data should be indicated: component and dataSource. The example below describes how to add `fc.attribute.json` component to the card on the Setting details page.1{
2 "type": "page",
3 "path": "settings/:id",
4 "component": "fc.page",
5 "descendants": [
6 {
7 "component": "fc.card.attribute",
8 "props": {
9 "title": "i18n:fc.admin.settings.detail.card.settingDetails.title",
10 "half": false,
11 "dataSource": "setting",
12 "attributes": [
13 {
14 "label": "i18n:fc.admin.settings.detail.card.settingDetails.attribute.value.label",
15 "value": "{{value}}"
16 },
17 {
18 "type": "component",
19 "options": {
20 "component": "fc.attribute.json",
21 "dataSource": "lobValue"
22 }
23 }
24 ]
25 }
26 }
27 ]
28}How to add components to a list
In case one needs to add a component to a list, e.g., apply different styles to multiline data represented in a cell of`fc.list` component, the following should be done:- add to the column of fc.list type and options;
- options should contain components, props, dataSource.
`fc.attribute.column` component to the list on the Roles&Permissions page.1 "type": "page",
2 "path": "roles",
3 "component": "fc.page",
4 "descendants": [
5 {
6 "component": "fc.list",
7 "props": {
8 "dataSource": "roles",
9 "attributes": [
10 {
11 "label": "i18n:fc.admin.rp.index.list.column.roleName.heading",
12 "template": "{{node.name}}",
13 "link_template": "#/roles/{{node.name}}"
14 },
15 {
16 "label": "i18n:fc.admin.rp.index.list.column.permissions.heading",
17 "type": "component",
18 "options": {
19 "component": "fc.attribute.column",
20 "props": {"value": "{{name}}"},
21 "dataSource": "node.permissions"
22 }
23 }
24 ]
25 }
26 }
27 ]
28}How to configure navigation from Dashboard to the page with applying date and time range filter
Step 1. Go to Admin > Settings and filter the list of settings by name`dashboard:`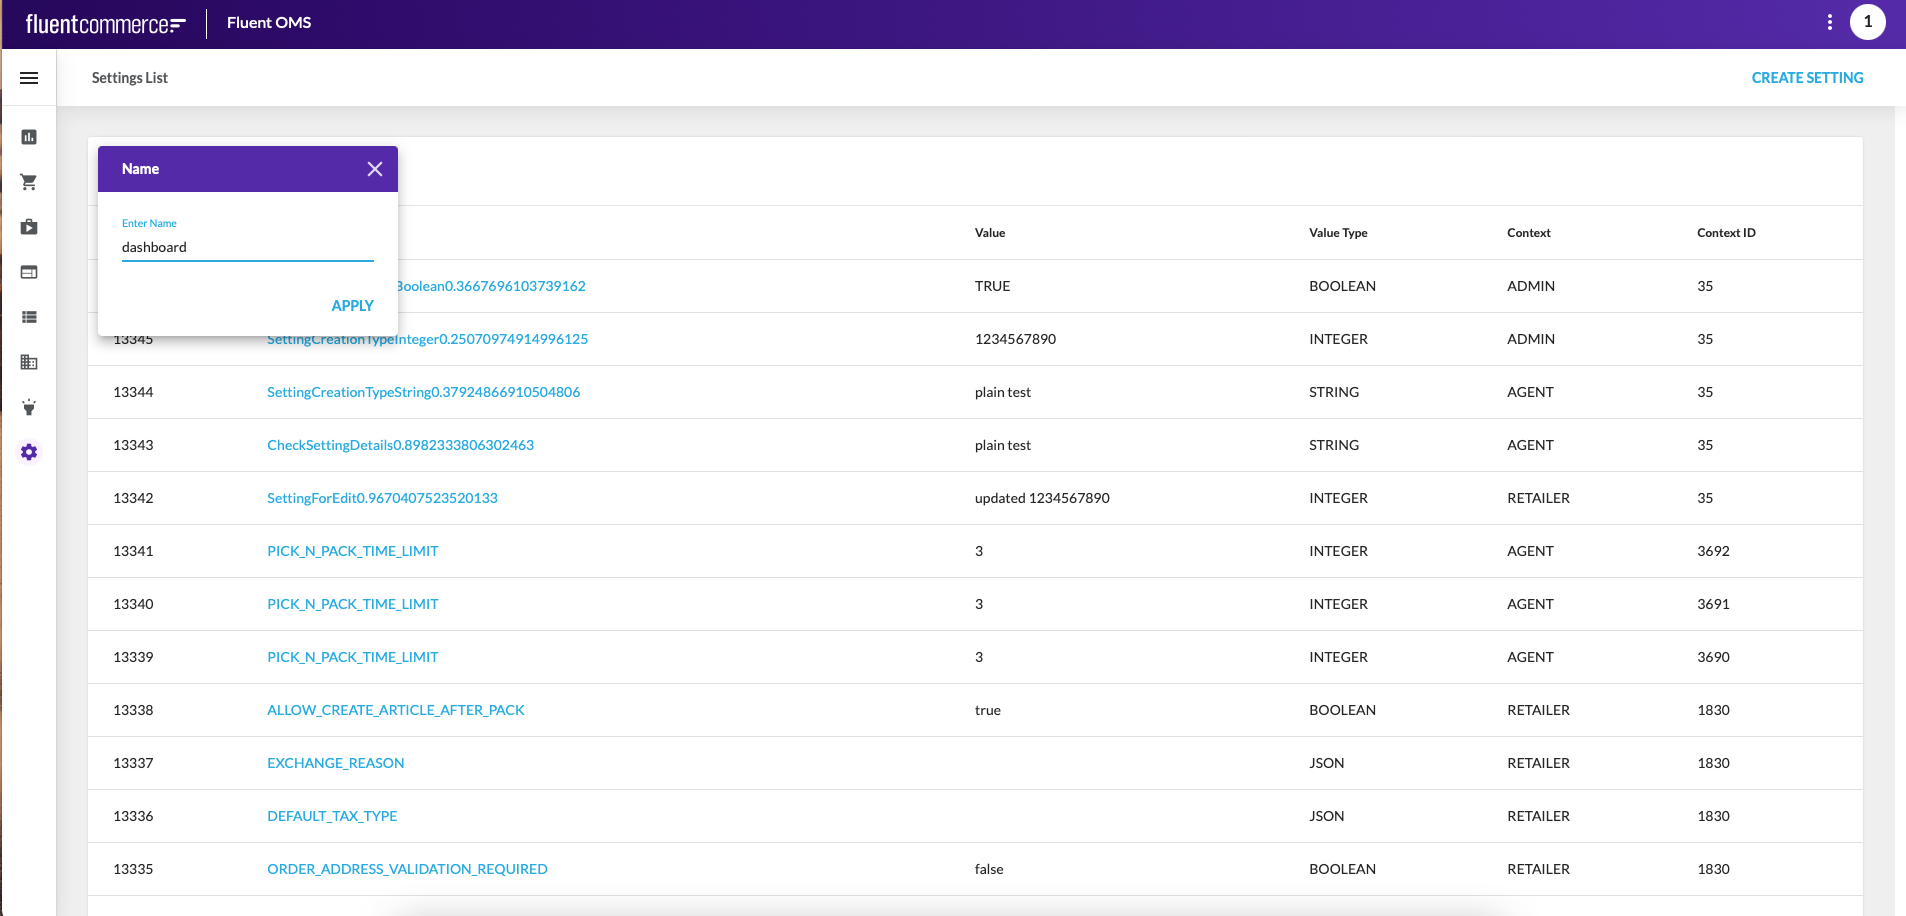 Step 2. Go to the details page of the setting and click Edit button.Step 3. Find threshold from which you would like to navigate with date and time range filter applied.
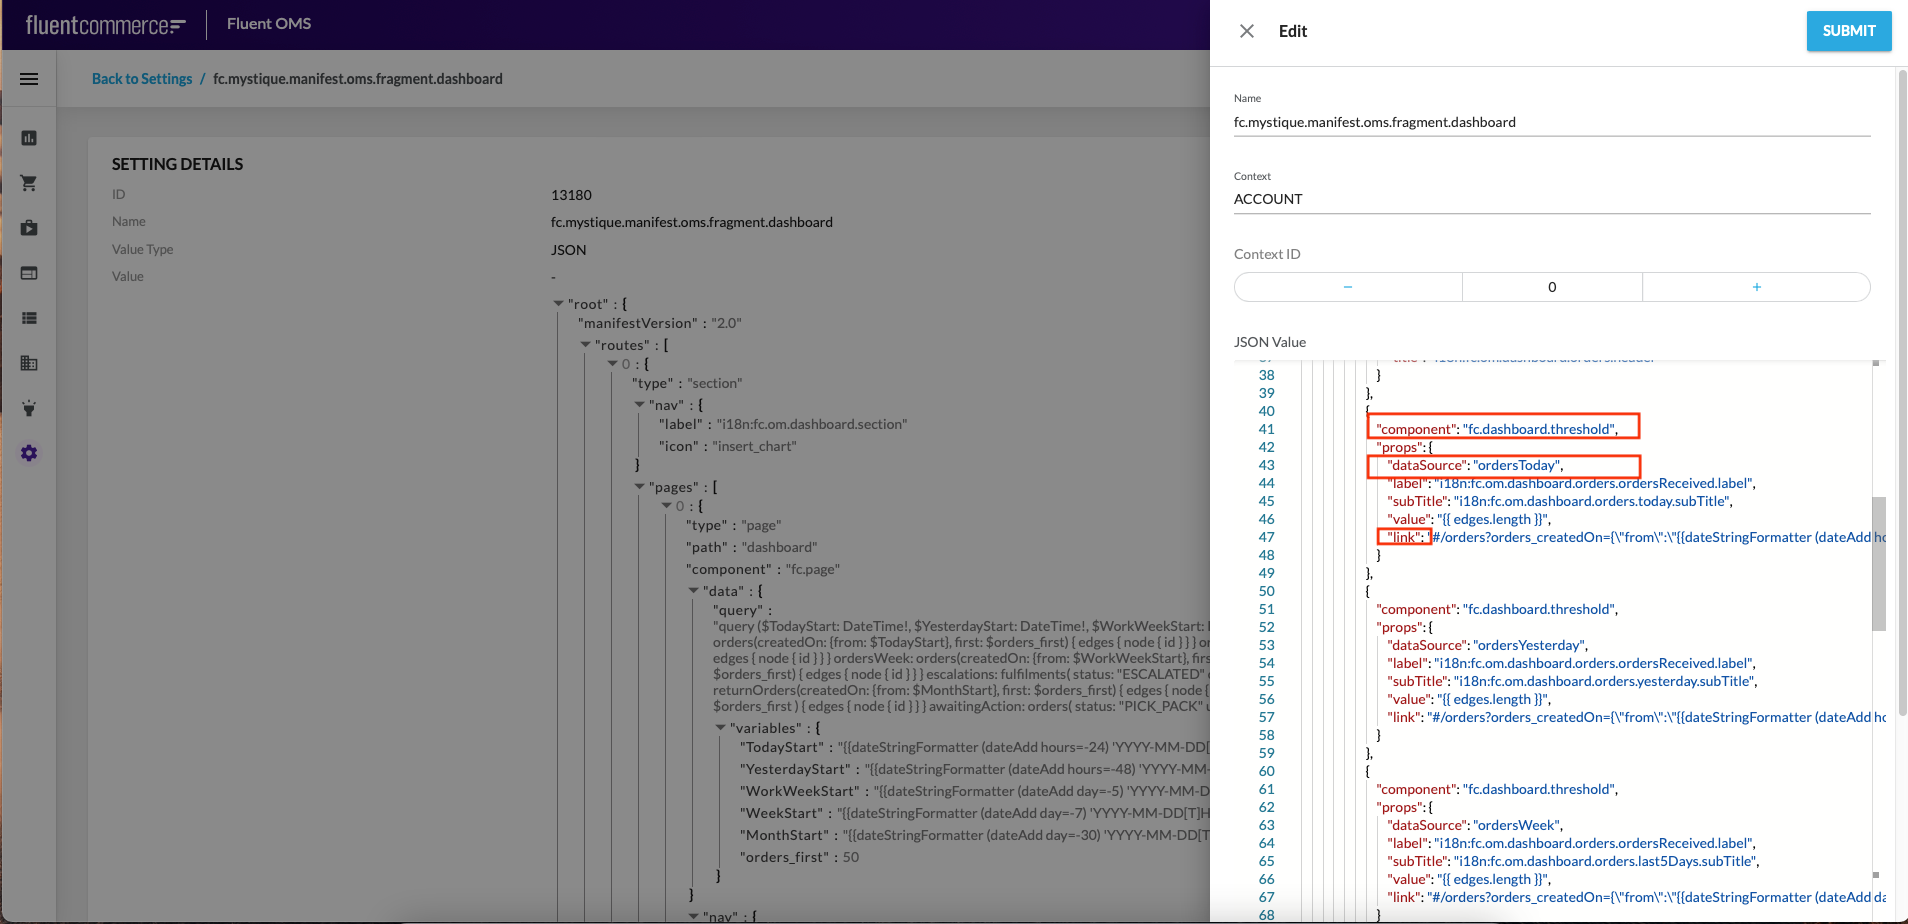 Step 4. Update
 `link` value with the following content:- for the tile ORDERS RECEIVED (Today (Last 24 hours)) (select component threshold with
`"dataSource": "ordersToday",`)`"link":"#/orders?orders_createdOn={\"from\":\"{{dateStringFormatter (dateAdd hours=-24) 'YYYY-MM-DD[T]HH:mm:ss.SSS' true}}Z\"}"` - for the tile ORDERS RECEIVED (Yesterday) (select component threshold with
`"dataSource": "ordersYesterday",`)`"link":"#/orders?orders_createdOn={\"from\":\"{{dateStringFormatter (dateAdd hours=-48) 'YYYY-MM-DD[T]HH:mm:ss.SSS' true}}Z\",\"to\":\"{{dateStringFormatter (dateAdd hours=-24) 'YYYY-MM-DD[T]HH:mm:ss.SSS' true}}Z\"}"` - for the tile ORDERS RECEIVED (Last 5 Days) (select component threshold with
`"dataSource": "ordersWeek",`)`"link":"#/orders?orders_createdOn={\"from\":\"{{dateStringFormatter (dateAdd day=-5) 'YYYY-MM-DD[T]HH:mm:ss.SSS' true}}Z\"}"` - for the tile ORDERS RECEIVED (Last 30 Days) (select component threshold with
`"dataSource": "ordersMonth",`)`"link":"#/orders?orders_createdOn={\"from\":\"{{dateStringFormatter (dateAdd day=-30) 'YYYY-MM-DD[T]HH:mm:ss.SSS' true}}Z\"}"` - for the tile ORDERS ESCALATED (Last 30 Days) (select component threshold with
`"dataSource": "escalations",`)`"link":"#/escalatedFulfilments?fulfilments_createdOn={\"from\":\"{{dateStringFormatter (dateAdd day=-30) 'YYYY-MM-DD[T]HH:mm:ss.SSS' true}}Z\"}"
` - for the tile RETURNS (Last 30 Days) (select component threshold with
`"dataSource": "returns",`)`"link":"#/returns?returnOrders_createdOn={\"from\":\"{{dateStringFormatter (dateAdd day=-30) 'YYYY-MM-DD[T]HH:mm:ss.SSS' true}}Z\"}"
` - for the tile ORDERS CANCELLED (Last 30 Days) (select component threshold with
`"dataSource": "cancelled",`)`"link":"#/orders?orders_status=CANCELLED&orders_updatedOn={\"from\":\"{{dateStringFormatter (dateAdd day=-30) 'YYYY-MM-DD[T]HH:mm:ss.SSS' true}}Z\"}"
` - for the tile ORDERS AWAITING ACTION (Older than a week) (select component threshold with
`"dataSource": "awaitingAction",`)`"link":"#/orders?orders_status=PICK_PACK&orders_updatedOn={\"to\":\"{{dateStringFormatter (dateAdd day=-7) 'YYYY-MM-DD[T]HH:mm:ss.SSS' true}}Z\"}"`