commercetools Package Installation
Author:
Fluent Commerce
Changed on:
31 Jan 2024
Key Points
- In order to utilize the commercetools connector, you would need to download the Java-based commercetools Fluent Connector and make sure you have the right dependencies and tools.
- Development and deployment: The development environment needs to be configured with the correct credentials. The build and run are done via dockers and scripts. CloudFormation can be leveraged for production deployment.
- Connect SDK and commercetools Connector should have matching versions for increased stability.
Steps
Downloading the Project
The latest version of commercetools Fluent Connector can be found here: commercetools Fluent Connector - the latest version. This is a zip file of a java project that also includes documentation and some handy scripts/templates.
Project Requirements
- JDK 17
- Maven 3.8+
- Docker + docker-compose
- AWS CLI (for developers)
- IntelliJ / STS / Eclipse or similar (for developers)
- AWS tool kit plugin
Product Structure
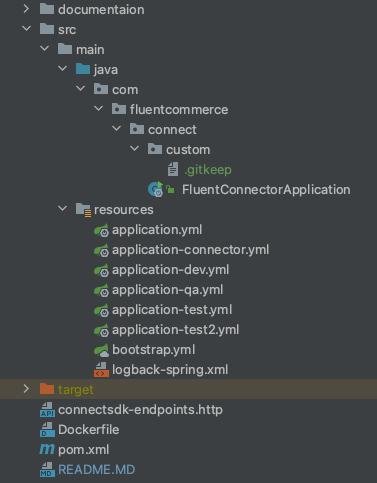
A Fluent Connector project typically has the structure as defined below. Any customizations/extensions can either be done under the custom folder or as a separate module (jar) altogether.
Regardless of which way one chooses to extend it, the key message here is that any custom code should be under the
`com.fluentcommerce.connect`
1package com.fluentcommerce.connect;
2
3@EnableScheduling
4@SpringBootApplication
5public class FluentConnectorApplication {
6 public static void main(final String[] args) {
7 SpringApplication.run(FluentConnectorApplication.class, args);
8 }
9}
Language: java
Name: FluentConnectorApplication.java
Description:
[Warning: empty required content area]This project relies on 3 key dependencies and a set of configurations to drive how the application behaves.
1<!-- Fluent Connect SDK -->
2 <dependency>
3 <groupId>com.fluentcommerce.connect</groupId>
4 <artifactId>connect-sdk-core</artifactId>
5 </dependency>
6 <!-- Fluent Connect SDK for AWS (allows the Connect SDK to be deployed on AWS -->
7 <dependency>
8 <groupId>com.fluentcommerce.connect</groupId>
9 <artifactId>connect-sdk-core-aws</artifactId>
10 </dependency>
11 <!-- Fluent Connect - Commercetools Features-->
12 <dependency>
13 <groupId>com.fluentcommerce.connect</groupId>
14 <artifactId>fc-commercetools-module</artifactId>
15 <version>1.0.3</version>
16 </dependency>
17
Language: xml
Name: pom.xml
Description:
[Warning: empty required content area]All configuration files are located at
`src/main/resources`
Upgrading the Connector
The version of the commercetools Connector and Connect SDK is driven by both the parent POM and dependency as shown below. It is important that when upgrading both versions match.
1 <!- Controls the Connect SDK version and shared dependencies -->
2 <parent>
3 <groupId>com.fluentcommerce.connect</groupId>
4 <artifactId>commercetools-modules</artifactId>
5 <version>1.0.3</version>
6 <relativePath/>
7 </parent>
8
9 ....
10 <!- Controls Commercetools Connect version -->
11 <dependency>
12 <groupId>com.fluentcommerce.connect</groupId>
13 <artifactId>fc-commercetools-module</artifactId>
14 <version>1.0.3</version>
15 </dependency>
Language: xml
Name: pom.xml
Description:
[Warning: empty required content area]Although it is possible to have a different version of the Connect SDK specified at the dependencies, it is recommended to let the parent POM settings bring the correct dependency as using a newer version may introduce problems as it hasn't been tested or released for the commercetools connector yet.
Development Environment Setup
For local environment setup, follow Local Setup Guide.
Credential Configuration
Credential with AWS Secret Manager Follow the Secret Setup Guide
commercetools Project Configuration
Check commercetools Connector Project Configuration for more details of the application configuration files.
Fluent Account Listener Configuration
Add the necessary Fluent settings to allow the connector to function properly Fluent Settings Guide .
Pre-Production and Production Environment Setup
The deployment steps covered here are but a guideline and are not to be taken to the letter as every company has different security policies, deployment, and monitoring processes. This is not a comprehensive or complete tutorial on how to deploy and run containers.
Building the Project
The project provides a script that builds the Java artifact and generates a docker image that can be deployed in any environment. The container expects certain variables that allow the same image to be used in different environments. More information on the Deploying topic.
1./build.sh
Language: json
Name: Build script
Description:
[Warning: empty required content area]If all goes well, a docker image named fluent_connector_commercetools should be available on the build server. At this point, the container image should probably be published to an image repository like AWS ECR.
Verifying it works
It is possible to run the connector on any machine that has docker and docker-compose installed. The steps below show how to build and run the container.
1# Builds the containers
2docker-compose -f docker-compose.yml build
3# Runs the containers and their logs will be visible on the terminal. To have the containers running in the background, include '-d' at the end of the command line. Note that this will not give you logs at the terminal, use docker -logs <container>.
4docker-compose -f docker-compose.yml up
Language: json
Name: Builds & runs the containers
Description:
[Warning: empty required content area]Deploying
A sample CloudFormation template that can create a stack with all that is required and deploy the container image is included as part of the project. For more information, see - Cloud Formation Template.
Please note the configuration steps required for setting up the credentials and Fluent settings.