Weather Updates
How-to Guide
Author:
Fluent Commerce
Changed on:
20 Nov 2023
Key Points
- In this guide, we will go through some basic features of the SDK by creating a connector from scratch that can receive or retrieve weather updates and push them to a Fluent setting.
- If you wish to bypass this guide and look at the result, feel free to download the sources.
Steps
 Overview
These are the topics covered by this guide:
- Creating a new connector project
- Adding a new SQS Queue listener
- How to map an external system to a Fluent retailer
- How to process a message received
- How to determine the correct message route
- Receiving and processing messages from the SQS listener
- How to read a property from Fluent
- Code generation from GraphQL files
- How to upsert (create or update) a setting in Fluent
- Adding a job and executing it
- Opening an HTTP endpoint that can receive inputs and queue them to be processed
Prerequisites
- localstack container is running
- You have access to a Fluent account
`localstack-setup.sh` bundled with the project that can be used to set up localstack. The script requires some parameters to be configured before it can be executed.It is best to do the following:First, run this command to open a session with the localstack containerThen use the commands below to create the secrets, but ensure to update the variables: $ACCOUNT, $RETAILER, $USERNAME, $PASSWORD and $REGION. Regions values are: sydney, dublin, singapore or north_america.Use ctrl + D to exit the localstack session.
Creating the project
Follow the SDK guide to create a new project - Creating a new connector with the SDK
Setting up the IDE
Open the maven project in your preferred IDE and create 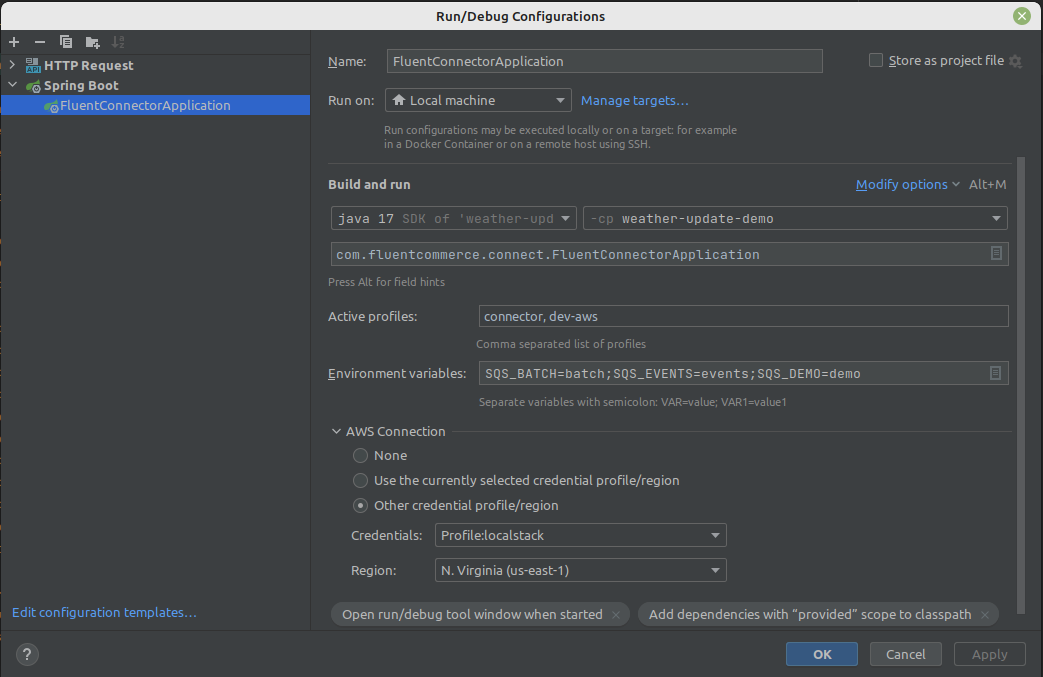 All initial required steps have been configured, and it is possible to start the application.
`docker-compose-localstack.yml` file in order to start localstack.With the IDE open the localstack running, follow the SDK setup steps.The essential steps are now complete and so lets start working on the weather demo project. Add the variable below to the "Run Configuration" environment variables, as shown in the screenshot. `SQS_DEMO` contains the actual name of an SQS queue that we will use on this sample project.All initial required steps have been configured, and it is possible to start the application.Adding a new queue listener
It's time to start coding….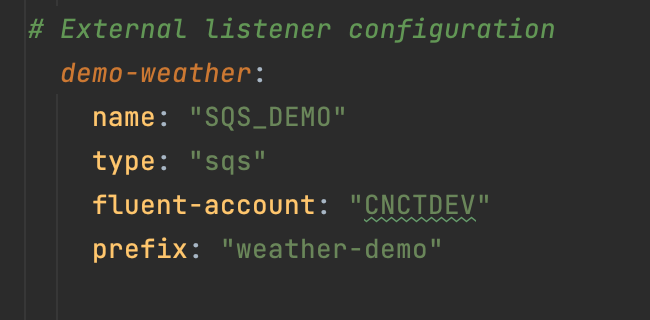
Setting name at Retailer context on Fluent setting :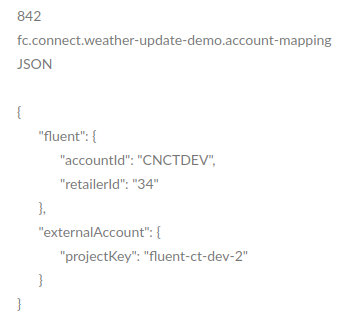 The last step is to configure a route mapping. This feature allows your listener to choose which route to use for the incoming message based on the mapping defined. This is useful when your listener receives different types of messages and each type should be processed differently as they are different in nature. For example, your listener receives both weather update and weather warning update. By setting a routing table (aka route mapping) to forward these 2 messages to 2 different handlers, you can have give each handler a very specific task to do and this helps the maintenance, evolution as well as re-usability of your handlers
 GraphQL
Queue configuration
The first step in creating a listener is creating a configuration, as shown below. See SDK configuration steps for further details. There are two files in the screenshot below, and these are two different versions of the`application.yaml` with a spring profile at the end of it: `-dev` and `-connector`. Although it is possible to achieve the same by just having one, this is to illustrate that a queue can be bound to different Fluent accounts for different deployment environments.These are the key properties to create:`demo-weather`: the listener ID, and it must be unique. It is important to keep the id`demo-weather`as it will be referenced elsewhere in this sample.`name`: Contains the environment name that can return the actual queue name. The purpose of having it as an environment variable is so that during the deployment of a container, it can receive as a parameter the queue name allowing different queue names between different deployment environments.`type`: it has to be sqs as this project uses the`connect-sdk-core-aws`as an example.`fluent-account`: the SDK requires that a queue is bound to a Fluent account.
Queue listener
Let's create some java classes with the listener configuration out of the way. Create a new package`custom` under `com.fluentcommerce.connect` and let's use this custom package for classes of our sample/demo project.Queue Message
WeatherData will be the only data type (DTO) we will use in the demo.Queue listener
`DemoQueueListener` is the component that will subscribe to the SQS queue and receive the messages. This class doesn't process the message, it instead validates that a route can be found to process it and determines the retailer this message will be processed with. Note that we will only consider working with one retailer in this example.The class below uses a fixed value for `SAMPLE_FIXED_ID` and `EXTERNAL_ID` for the Fluent account mapping. This is the process where a message received can be for one or another retailer of the same account, and based on parameters received on the message, the SDK will find the correct retailer to use. Again, we are working with a single retailer in this example, and the message received doesn't carry that information.In the code example below, there is a method `getMessageRoute` that returns a message route based on the information received in the message. The configuration will be covered on the following topic: the `id` property received on the message needs to match the configuration property `name`.For the Fluent account mapping to work, we need to configure a new setting at the retailer used during the localstack credential setup process. The setting key has to follow the pattern: `fc.connect.<connector-name>.account-mapping`. The value of `connector-name` is the name of the connector given when creating the project, and it can also be found at `application-connector.yml`.Configuration Template:Setting name at Retailer context on Fluent setting :
`fc.connect.<connectname>.account-mapping`For our demo, please set the external account as shown below:The last step is to configure a route mapping. This feature allows your listener to choose which route to use for the incoming message based on the mapping defined. This is useful when your listener receives different types of messages and each type should be processed differently as they are different in nature. For example, your listener receives both weather update and weather warning update. By setting a routing table (aka route mapping) to forward these 2 messages to 2 different handlers, you can have give each handler a very specific task to do and this helps the maintenance, evolution as well as re-usability of your handlersQueue Message Handler
When working with message handlers, the route to a handler is specified by an annotation HandlerInfo:`route =` `fc.connect.sample-weather-update`. The purpose of a route is to tell the SDK to forward any messages with given route to a particular handler so your logic can be applied to process the message.Utility class
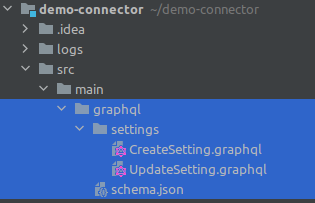
UpsertSettingUtils class is used by both the message handler and job in our example to connect to Fluent and upsert a setting. The setting name is hardcoded below a`FLUENT_SETTING_KEY = "fc.connect.weather-update-demo.current-weather"`.This class makes GraphQL mutation calls to Fluent, so let's create some GraphQL files and have the SDK generate their stubs. You should be able to find a `graphql` folder under the main that will contain the GraphQL schema (schema.json). The other two files highlighted need to be manually created for our demo as follows:GraphQL- CreateSetting.graphql
- UpdateSetting.graphql
`apollo-client-maven-plugin` in the `pom.xml`. This is disabled by default, as the build would fail without any GraphQL queries to generate code. Now let's run maven compile the code generation will create the necessary stub,s and the code should compile and resolve all errors.Testing the queue
It is now possible to start the application and test the queue. When the application starts, all necessary queues will be auto-created by the SDK and immediately start listening for any new messages. To publish a message to the demo connector, run the command below. The message below simulates sending a weather update to the connector, which will update Fluent with a said weather update.To validate that it works, check the logs of the demo connector and Fluent settings by searching for
`fc.connect.weather-update-demo.current-weather`. This should contain the same weather update as the message above.Adding a job handler
The next step is to add a job handler pretending to retrieve weather updates from external systems. In this example, return a random update from a pre-defined list.The SDK doesn't have an internal scheduler, so it relies on external systems to trigger the job/batch execution. In AWS deployments, we recommend using EventBridge, for example. EventBridge will call a given URL when the clock ticks. It’s time to run the job. To simulate such behavior, just run the command below but ensure to update the URL with the account and retailer first. Please use the account and retailer as configured in
`localstack-setup.sh.`Example of the CURL with the replaced values:Adding a new HTTP endpoint
Another way to receive updates from external systems is to open an HTTP endpoint. The example below receives the same payload we used in the queue example.This is a straightforward example without authentication or authorization, with hardcoded values as the Fluent account and message route. We recommend securing any endpoint exposed to the WEB with authentication and authorization.The controller above expects a configuration to exist at
`application-connector.yml` to hold the account and retailer. This should match the ones used at - `localstack-setup.sh`. Here is an example:To test the HTTP endpoint, run the command below: