In this module, you will learn about Unit Testing and creating a Mocked Unit test for a custom Rule. You will also learn how to perform testing on the TestExecutor and finally deploy your plugin into your sandbox environment
Key points
Unit Testing
PowerMock
TestExecutor
Testing on Sandbox
Unit Testing
As Rules are atomic in size and complexity. We recommend a Test-Driven Development (TDD) approach. It is an approach where you first write tests, then use those tests to drive the design and development of your software application/rules. The TDD approach is also known as Red, Green, Refactor: ✅ Write a test (Red) ✅ Get the test to pass (Green). ✅ Optimise the design (Refactor)Using this approach, Test cases are written for each Rules' functionality and are executed. In the event of a Test failing (I.e. not passing), a new code is written in order to pass the test by making the code simple and bug-free. This approach results in high-quality code. We recommended that you adopt the following steps when performing testing on the Fluent Platform:
Create a fully Mocked Unit Test (using IDE's Unit Testing capabilities) for your custom Rule. In the Mocked unit test perform one (1) assertion per test case and test both positive and negative paths.
Test your Rule in the TestExecutor. The TestExecuter can be viewed as a mini Workflow Engine simulator that runs on your local machine to assert additional behavior.
Deploy your plugin to your Sandbox account.
Fluent is currently using JUnit 4 as the Unit testing Framework — your plugin project pom.xml already has a dependency on JUnit.💡 The above steps will be explained in the upcoming lessons of this section
Note
The included videos will explain how to combine the code snippets into a workable example.
TestExecutorThe TestExecutor simulates the Workflow Engine and allows developers to set up a mock Workflow for Unit Testing. This testing on TestExecutor helps to assert some additional behaviour of the Rule. Learn more in Testing Rules.
Writing Unit Tests - Recommended Practices
Tests must be isolated and repeatable
Tests must cover positive and negative paths
Tests must be proven to fail when they should (Red, Green, Refactor)
Tests should have a single assertion
Tests should not assume anything
Tests should where possible only use mocked dependencies, including data objects, utils, services, etc.
Mocked Unit Testing
Remember this client?This lesson relates to the Client Scenario — Implement Fraud Check covered in Module 4.We have already created a RuleMarkOrderHighValueRule that implements Fraud Check, as per our client's requirement. In this lesson, we will create a Mocked Unit Test for the MarkOrderHighValueRule class.These tests are Ideal for TDD (Test Driven Development).
Software prerequisites
Make sure that you've installed the software listed in the Software Prerequisite Section. Use the following checklist to ensure you are ready for testing.
Ensure IntelliJ (Java IDE) has a JDK path set to 1.8 and Maven 3.6 is configured within IntelliJ.
Configure IntelliJ for unit testing with JUnit4
If you are using Maven> 3.6, add a mirror (a dependency provided in Software PrerequisitesSection ) in your Maven directory (.m2 >repository > settings.xml file).
💡 Follow the steps below to create mocked unit tests for your custom GraphQLRule
Create a Mocked Unit Test class for your custom Rule
Open your plugin project in which you have written the MarkOrderHighValueRule class.
In the src/test/java/com.training/rule folder of your plugin project, create a new class named MarkOrderHighValueRuleTest.
Write a setup method to initiate the mocks. This setup method will run before every test in the class. The setup method uses MockitoAnnotations class to initiate Mocks(initMocks). Mockito is the Fluent mocking framework.
Define a mock on Context, which is a required parameter of the run method in the Rule class.
Important:
Make sure you import the v2 version of Context i.e use this package com.fluentretail.rubix.v2.context.Context
The org.mockito package can mock all classes except final classes.
*After completing Step 1, your code should look similar to the one below:
12 package com.training.rule;
34 public class MarkOrderHighValueRuleTest
5 {
67 private MarkOrderHighValueRule rule = new MarkOrderHighValueRule();
89 @Mock
1011 private Context context;
1213 @Before
1415 public void setup()
16 {
1718 MockitoAnnotations.initMocks(this);
1920 }
2122 }
Use Mockito to write test cases
The Test method uses the AAA (Arrange, Act, and Assert) approach, where you arrange the steps, act and then assert.Let's create our first test case. We'll begin by asserting the expected behaviour for parameter validation.The run method of MarkOrderHighValueRule class validates that Rule must have a valid parameter. Given below is the code snippet for validation from MarkOrderHighValueRule class:
1/**
2 * NOTE: This is a snippet from `MarkOrderHighValueRule class from 'Writing the Rules' section
3 **/
45// Validation:
6Integer threshold = context.getProp(Constants.PARAM_NAME_HIGH_VALUE_THRESHOLD, Integer.class);
7if (null == threshold)
8{
9 throw new PropertyNotFoundException(400,String.format("Required Parameter not provided: %s", Constants.PARAM_NAME_HIGH_VALUE_THRESHOLD));
10}
As shown in the above snippet, the run method should throw PropertyNotFoundException if the parameter is null. Our first test case will assert this behaviour of the run method.Perform the steps below to create a test case:
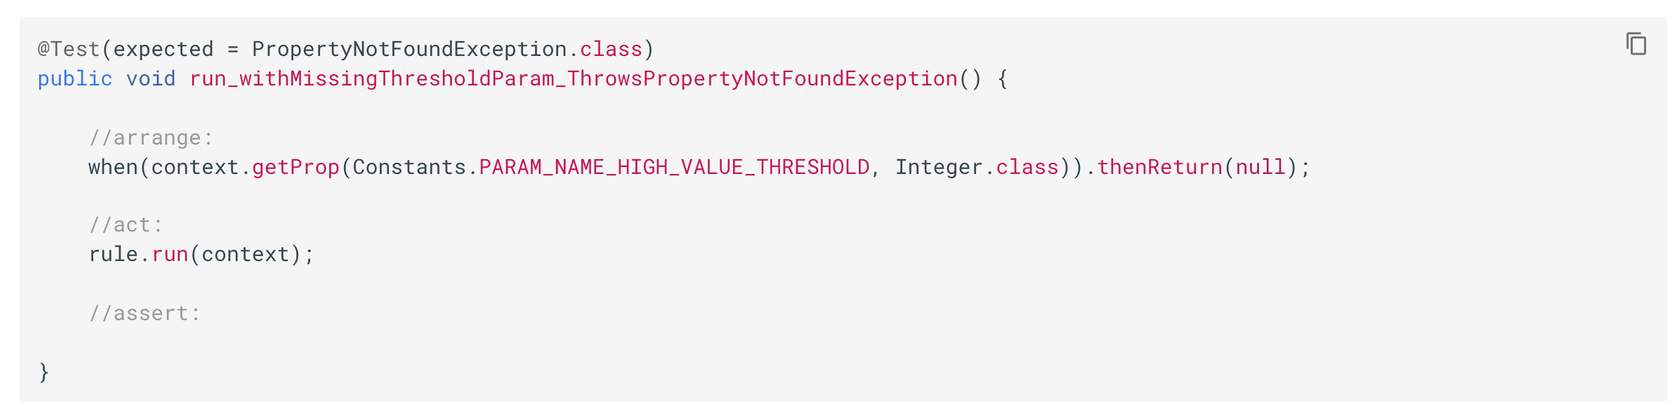
Create a test method named run_withMissingThresholdParam_ThrowsPropertyNotFoundException ( ).
The run method throws a PropertyNotFoundException, so we don't need any assertion in the Test case. The Test expected behaviour will manage the exception with the following line of code: @Test(expected = PropertyNotFoundException.class)
Use a negative path test: In the arrange section of the Test, get the property. If the property returned is null, then it throws an exception.
Run the test case: On IntelliJ use control+shift+R key code. Or, right-click inside the method, and select run_withMissingThresholdParam_ThrowsPropertyNotFoundException method.
* Your test case should Pass.Learn more about AAA approach in the Test Case.
👁🗨 Video Demonstrating Steps 1 & 2: Create a Mocked Unit Test / Use Mockito to write test cases
This video illustrates how to:✅ Write a Test case.✅ Import org.mockito package for the Mocking framework.✅ Importcom.fluentretail.rubix.v2.context.Context package for Context.✅ Write a Test case to assert expected behaviour for parameter validation.
Include PowerMock and prepare to write the test case
As the Event class is a final class, the org.mockito package can't mock it. We need to make use of PowerMock, it will make the final class use a different test runner and will prepare a class for the test. Perform the steps below to add PowerMock into your plugin project:
Open the pom.xml file in your project.
Copy the dependencies ( provided below) under the existing Mockito dependency
Check the scope is set to test
Clean the Maven project.
Given below are the dependencies needed for the PowerMock:⚠️ Make sure your IDE imports Maven changes after the maven's clean.
As we are using PowerMock, we need to define a different test runner for PowerMock. Refer to the table below to define and prepare the test runner class for PowerMock
Annotation
Purpose
@RunWith
E.g. @RunWith(PowerMockRunner.class) is used to define a different test runner for PowerMock
@PrepareForTest
E.g. @PrepareForTest(Event.class) is used to prepare the runner for the Event class as the Event is the final class
Define/Write the default behaviour of above defined Mocks in the setup ( ) method.
Click on the + buttons to learn more about the setup() method for Powermock
PARAM_NAME_HIGH_VALUE_THRESHOLD value - returns the default value of $1000
(context.getEvent()) - it will return the mocked event value
event.getEntityId()) - will return the default String value of "123"
Other context values - context.api() , apiClient.query(any(), data.orderById() will return respective mocked values
👁🗨 Video Demonstrating Step 3: Include PowerMock and prepare to write the test case
This video illustrates how to:✅ Add PowerMock to your plugin✅ Define the test runner class and prepare the test class✅ Define the required Mocks and the default behaviour of defined Mocks in the setup() method.
Create a test case using PowerMock
Let's begin with a simple test case: "Verify that the Order is updated when the Total Price is above the Threshold"For this test, we will verify that the MutationAction is queued via the Context's ActionFactory (context.action( ).mutate( )), with the GraphQL Mutation Object ( UpdateOrderAttributesMutation)Perform the following steps:
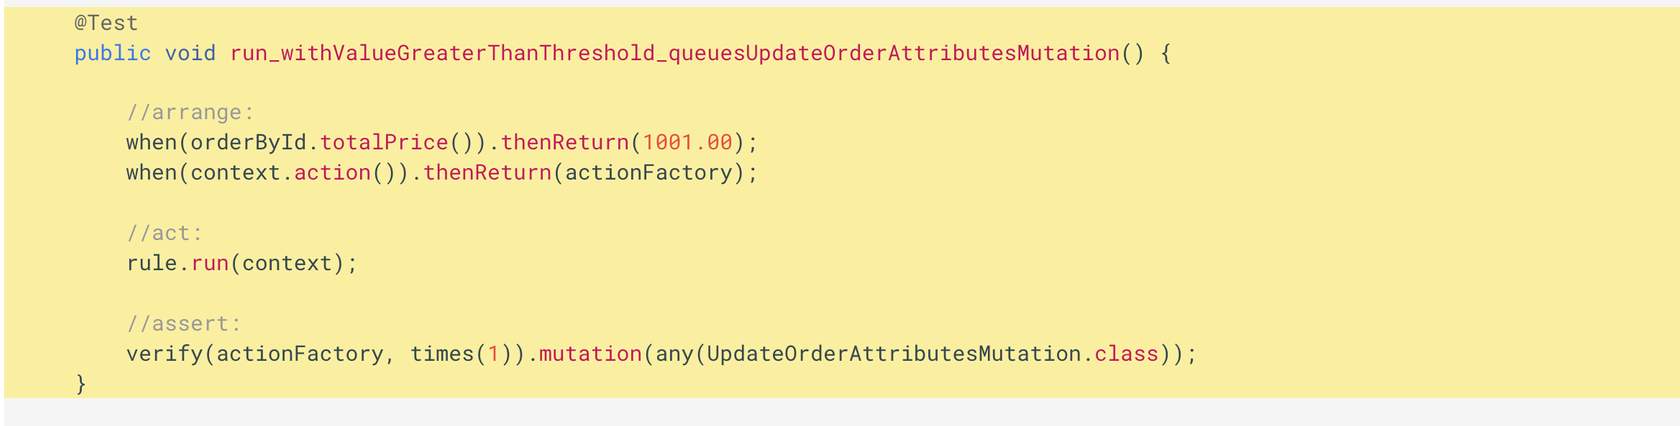
Create a test method named as run_withValueGreaterThanThreshold_queuesUpdateOrderAttributesMutation()
The "arrange, act and assert" approach of the test method is explained in the given below interaction (See diagram below).
Run the test case: On IntelliJ use control+shift+R key code. Or, right-click inside the method, and select run run_withValueGreaterThanThreshold_queuesUpdateOrderAttributesMutation() method.
*Your test case should Pass Click on the + buttons to learn more about the required code for this test case:
Arrange - if the order's totalprice value is greater than the default value set in the setup() method then it will return value greater than default value for totalPrice. It also returns mocked actionFactory.
Act - it will make the rule run on the mocked context.
Assert - It will verify that the mutation is called only one time and is of any UpdateOrder type.
👁🗨 Video Demonstrating Step 4: Create a Test Case using PowerMock
This video illustrates how to:✅ Write a test case to assert the Order is updated when the Total Price is above the Threshold.✅ Run the test case using PowerMock defined and prepared runner class
Write another test case using PowerMock
Let us assert that "The Attribute is being built correctly."We'll start with verifying the attribute name by mocking the AttributeInput.Builder class. This will allow us to verify that the attribute name is set correctly.Perform the following steps:
Prepare PowerMockRunner by updating @PrepareForTest annotation to include AttributeInput.class . Your annotation should look like:
We recommend testing on TestExecutor before you upload your rule into your sandbox account. TestExecutor shows how the rule behaves when running in a local ThreadExecutor. It also asserts some additional behaviour.The TestExecutor allows developers to setup a mock workflow for unit testing of specific rules and simulates the Workflow Framework and provides the following methods:
rule(Class.class): load a rule
ruleset(RuleSet ruleSet): adds a ruleset to the workflow
entity(Entity entity): adds an entity to the workflow
validateWorkflow(Event event): validates the workflow with the given event
execute(Event event): executes the workflow with the given event
After execution, your tests can use the following for assertions:
count*(): Provides access to the number of events or actions that have been executed in the context.
get*(): Provides access to the entities, rules, events, and properties.
In this section, we will test our Rule in the TestExecutor. We will run the Rule under the following conditions, and assert the expected outcomes:
In the src/test/java/com.training/rule folder of your plugin project, create a new class named MarkOrderHighValueRuleExecutorTest .Declare fields, mocks, and setup() method as given in the code snippet below.
In the setup method, create an instance of a RubixEntity. This is an orchestratable entity inside of Rubix, which is made available to the Rule via the Context.Given below is the code snippet to create an entity
1@Before
2 public void setup() {
34 MockitoAnnotations.initMocks(this);
56 when(apiClient.query(any())).thenReturn(data);
78 // Setup up an instance of a Rubix Entity
9 RubixEntity entity = RubixEntity.builder()
10 .status("BOOKED")
11 .entityType("ORDER")
12 .flexType("flexType")
13 .flexVersion(1)
14 .ref(ORDER_ID)
15 .id(UUID.randomUUID().toString())
16 .build();
1718 }
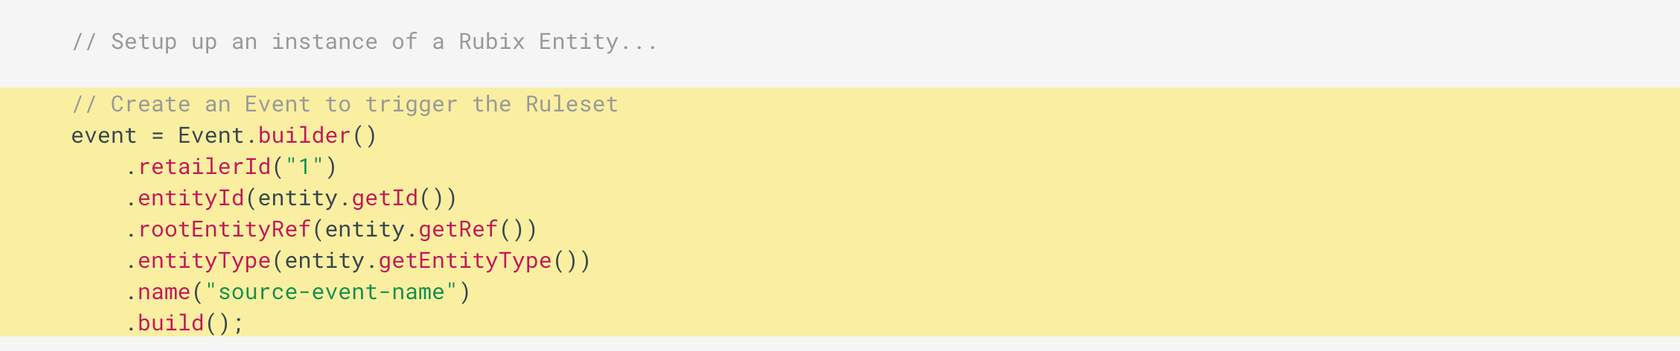
Step 3 - Create an Event to trigger the Ruleset
In the setup method, prepare the Event that will be used to trigger the workflow. Refer to the below interaction, click on + buttons to learn more about the code
Event.builder on declared Event instance - Use Event builder to build the event with the attributes of retailerID, entityID, rootEntityRef, etc.
Event.builder.build - Once the event is built, it will be used to trigger the workflow.
👁🗨 Video Demonstration for Steps 1 - 3
Click the PlayButton ▶️ to begin the video. This video illustrates how to:✅ Write a test class✅ Create an Evententity, and an Event to trigger the Ruleset
Step 4 - Create the Rule instance and Ruleset
We need to provide the following to TestExecutor to execute the test:
The Rule we are going to test.
Setup the Ruleset- ruleset configured with an instance of the Rule, an Entity, and an Event.
Do the following to create a Ruleset:
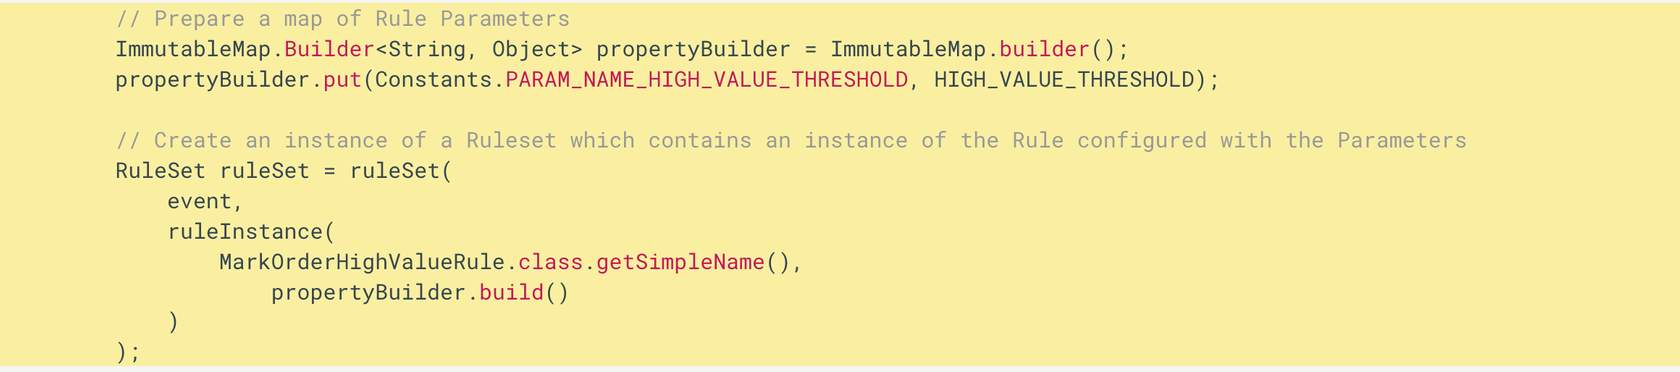
Create a map in the setup() method to show how the Rule is configured with Rule parameters in the Ruleset.
Create an instance of a Ruleset in the setup() method to hold an instance of the Rule that is configured with the parameters as shown in the interaction below
map of rule parameters - ImmutableMap will map required parameters of the Rule.
event paramater of ruleset - It is the event that is triggering the ruleset.
name of the rule - MarkOrderHighValueRule.class.getSimpleName() is the name of the Rule class
map builder - propertyBuilder.build() is the map builder that states how the rule is configured
Step 5 - Setup the TestExecutor
In the setup() method, initialise the TestExecutor to simulate the Workflow Engine using the code snippet below:
1// Set up a TestExecutor to simulate Orchestration Engine
2        executor = TestExecutor.builder()
3            .rule(MarkOrderHighValueRule.class)
4            .ruleset(ruleSet)
5            .entity(entity)
6            .testApiClient(apiClient)
7            .build();
Step 6 - Create a test case to run on TestExecutor
We have our TestExecutor prepared. Follow the steps to implement the test case.
Create a test method named run_withTotalPriceGreaterThanThreshold_callsMutateAction
The test method "arrange, act and assert" approach is in the below-given code snippet.